新增页面
这里的『页面』指配置了路由,能够通过链接直接访问的模块,要新建一个页面,通常只需要在脚手架的基础上进行简单的配置。
一、 新页面
接下来,我们从零开始来新增一个页面,这个页面非常简单,就是一个计时器
1. 新增 index.jsx、Store.js、index.less 文件
在 app / pages 下创建一个新的文件夹,并在这个文件夹下新增 index.jsx(或者 index.tsx)、index.less、Store.js 等文件,其中 index.jsx(index.tsx)文件是必须的,index.less 或者 Store.js 文件是可选的。
config
- app
-  pages
+   modalName         系统模块名称(小写字母名门)
+     NewPage         菜单组件页面(首字母大写命名)
+       index.jsx     组件入口
+       index.less    组件样式(css modules)
+       Store.js      组件状态管理(mobx)
  ...
...
package.json
一般一个经典的页面组件代码结构如下:
1.1 index.jsx
import React, { Component } from 'react';
import { observer } from 'mobx-react';
import Store from './Store';
import styles from './index.less';

@observer
class NewPageComponent extends Component {
  store = new Store();

  render() {
    const { count } = this.store;
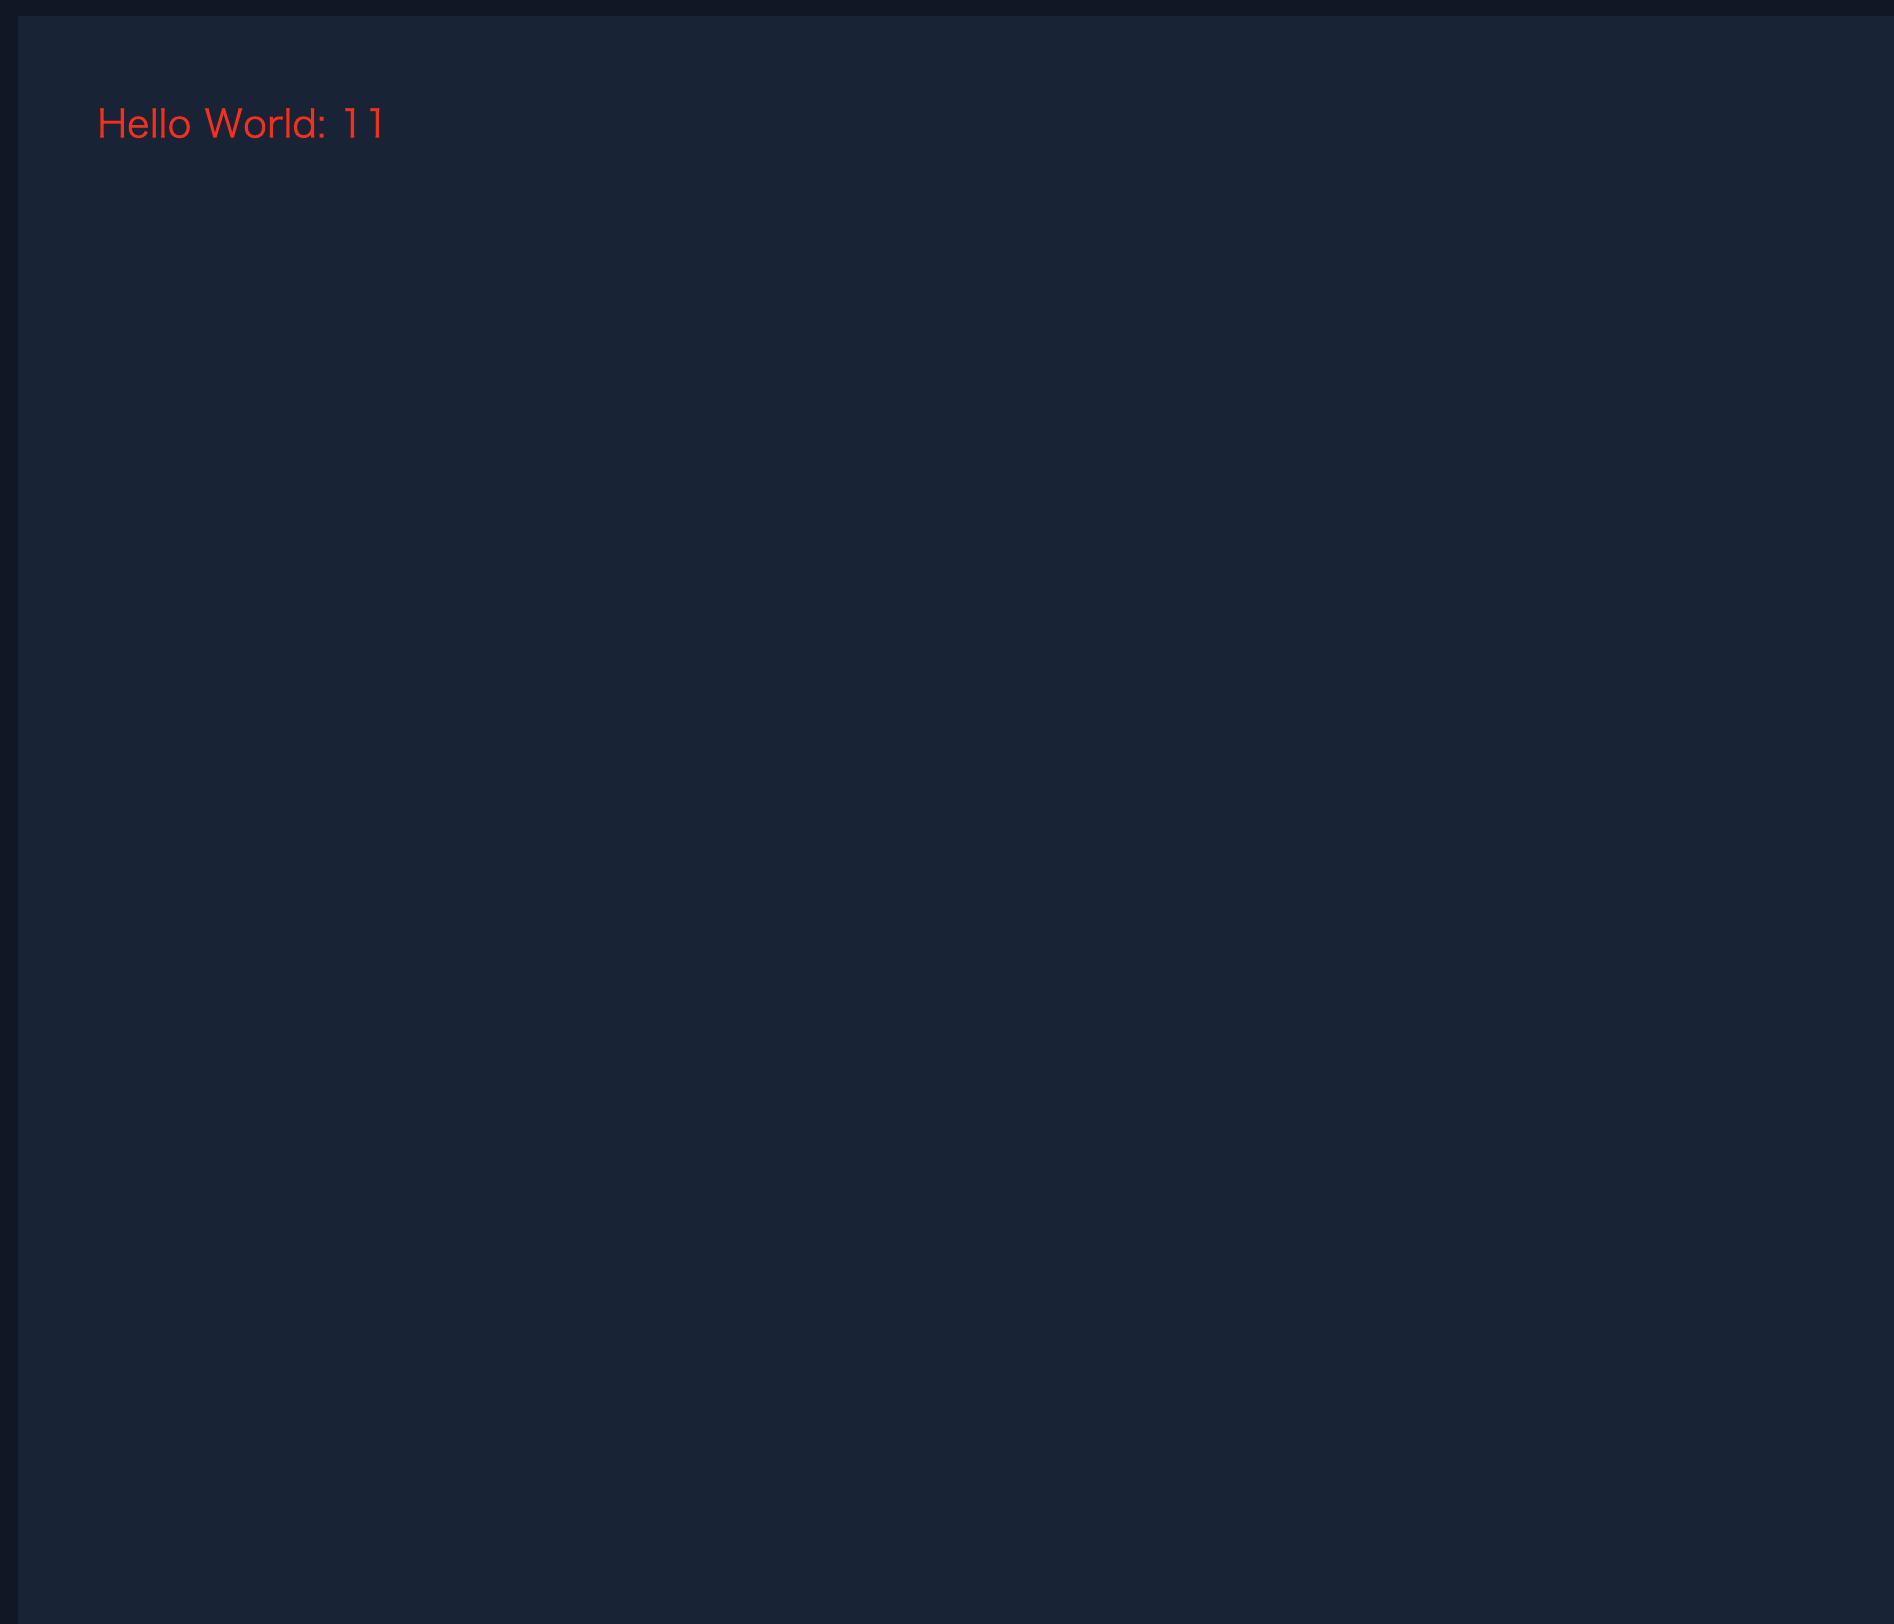
    return <div className={styles['container']}>Hello World: {count}</div>;
  }
}

export default NewPageComponent;
1.2 Store.js
import { observable, action } from 'mobx';

class Store {
  @observable count = 0;

  constructor() {
    let i = setInterval(() => {
      this.count++;
      if (this.count > 10 && i) {
        clearInterval(i);
      }
    }, 1000);
  }
}
export default Store;
1.3 index.less
.container {
  color: red;
  font-size: 24px;
  margin: 50px;
}
2. 新增菜单,指向文件路由
参考 路由和菜单章节,配置自己的菜单和路由,然后重启服务,访问 http://localhost:8888/ 就可以看到新增的页面了。
// 静态菜单配置文件:
  {
    "id": 11,           // 子菜单ID
    "pId": 10,          // 一级菜单ID
    "appId": "portal",  // 应用ID(与 UI应用的配置文件config/config.ts中的APP_ID一致,且不能设置为关键字 portal)
    "name": "新页面",   // 菜单名称
    "url": "modalName/NewPage" // 页面路径(相对于pages目录)
  },
二、 实战-用户管理页面
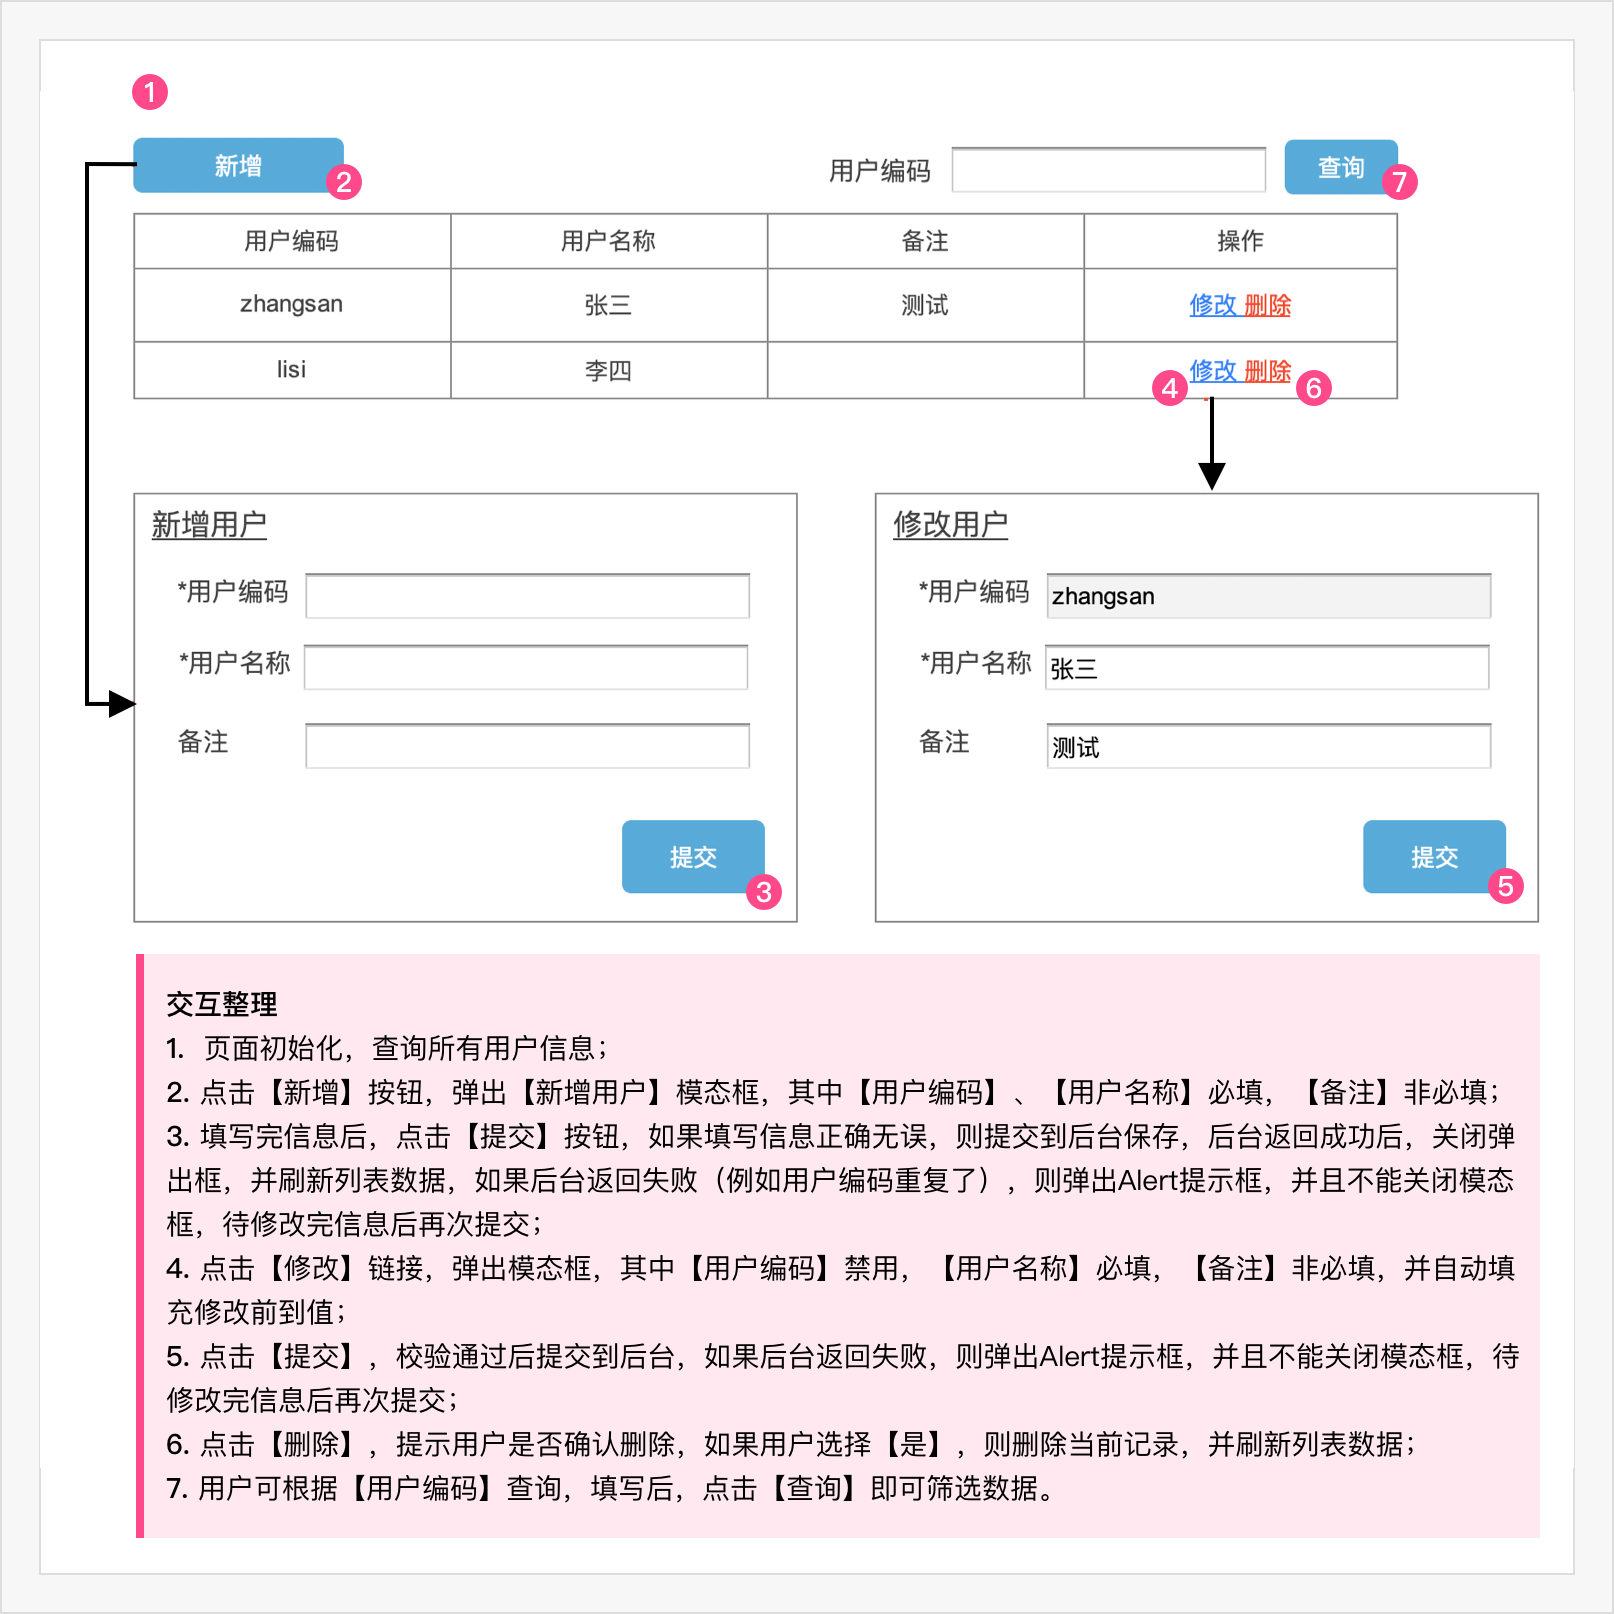
接下来我们来完成一个经典的增删改查的需求,这个需求是一个用户管理的功能,原型图和交互如下:
注意:用户管理相关代码可按照下述说明继续操作添加或手动安装示例代码,可参考安装示例代码
1. 用户接口的介绍
推荐使用 restful 风格的 API 接口,如有不清楚的请自行百度,Godzilla 框架的前后端接口规范请参考前后端接口规范。
以下 sample 服务接口(内部服务接口,仅供测试使用,请勿在生产环境中使用
1.1 查询接口(分页)
url: /sample/api/v1/users/query GET
查询参数
{
  "code": "",   // 选填,用户编码
  "page": 1,    // 分页码,这是框架约定,字段不能改
  "pageSize":20 // 分页pageSize,这是框架约定,字段不能改
}
返回数据
{
  "code": 200,
  "data": {
    "list": [
      {
        "code": "",   // 用户编码
        "name": "",   // 用户名称
        "remark": ""  // 备注
      }
      // ...
    ],
    "totalRecord": 2, // 总记录数,这是框架约定,字典不能改
  }
}
1.2 新增接口
url: /sample/api/v1/users POST
请求参数
{
  "code": "",  // 必填,用户编码
  "name": "",  // 必填,用户名称
  "remark": "" // 选填,备注
}
返回数据
// 成功
{
  "code": 200,
  "msg": "新增成功"
}
// 失败
{
  "code": 500,
  "msg": "失败原因",
  "msgDetail": ""
}
1.3 修改接口
url: /sample/api/v1/users/{code} PUT
请求参数
{
  "name": "", // 必填,用户名称
  "remark": "" // 选填
}
返回数据
// 成功
{
  "code": 200,
  "msg": "修改成功"
}
// 失败
{
  "code": 500,
  "msg": "失败原因",
  "msgDetail": ""
}
1.4 删除接口
url: /sample/api/v1/users/{code} DELETE
请求参数 无
返回数据
// 成功
{
  "code": 200,
  "msg": "删除成功"
}
// 失败
{
  "code": 500,
  "msg": "失败原因",
  "msgDetail": ""
}
2. 增加用户查询功能
这个一个很常用的功能,Godzilla 框架已经封装好了组件,这里用到了一个表格组件,我们的 AgGrid 组件已经满足该需求,组件文档中有很多的例子,我们可以找到一个适合本需求的例子,然后进行改造。
2.1 新增用户组件页面
config
app
  pages
    sample
+     User            组件名称
+       index.jsx     组件入口
+       index.less    组件样式(css modules)
+       Store.js      组件状态管理(mobx)
  ...
其中 index.jsx 的代码如下
import React, { Component } from 'react';
import { observer } from 'mobx-react';
import { AgGrid } from '@gza/quantex-design';

@observer
class UserComponent extends Component {
  // 初始化API
  searchApi = AgGrid.createSearchApi({
    api: 'sample',
    url: '/api/v1/users/query',
    method: 'get'
  });

  tableConfig = {
    tableId: AgGrid.Table.ID.sample_User_index,
    props: {
      columnDefs: [
        { headerName: '用户编码', field: 'code' },
        { headerName: '用户名称', field: 'name' },
        { headerName: '备注', field: 'remark' }
      ],
      pagination: true,
      rowModelType: 'serverSide',
      paginationPageSize: 20,
    }
  };

  formConfig = {
    fields: [
      {
        name: 'code',
        label: '用户编码',
        component: 'Input'
      }
    ]
  };

  render() {
    return (
      <div className="qx-main">
        <AgGrid.SearchFormTable
          tableConfig={this.tableConfig}
          formConfig={this.formConfig}
          searchApi={this.searchApi}
        />
      </div>
    );
  }
}

export default UserComponent;
2.2 新增菜单
参考 路由和菜单 章节,配置自己的菜单和路由。
{
    "id": 12,
    "pId": 10,
    "appId": "portal",
    "name": "用户管理",
    "url": "sample/User"
}
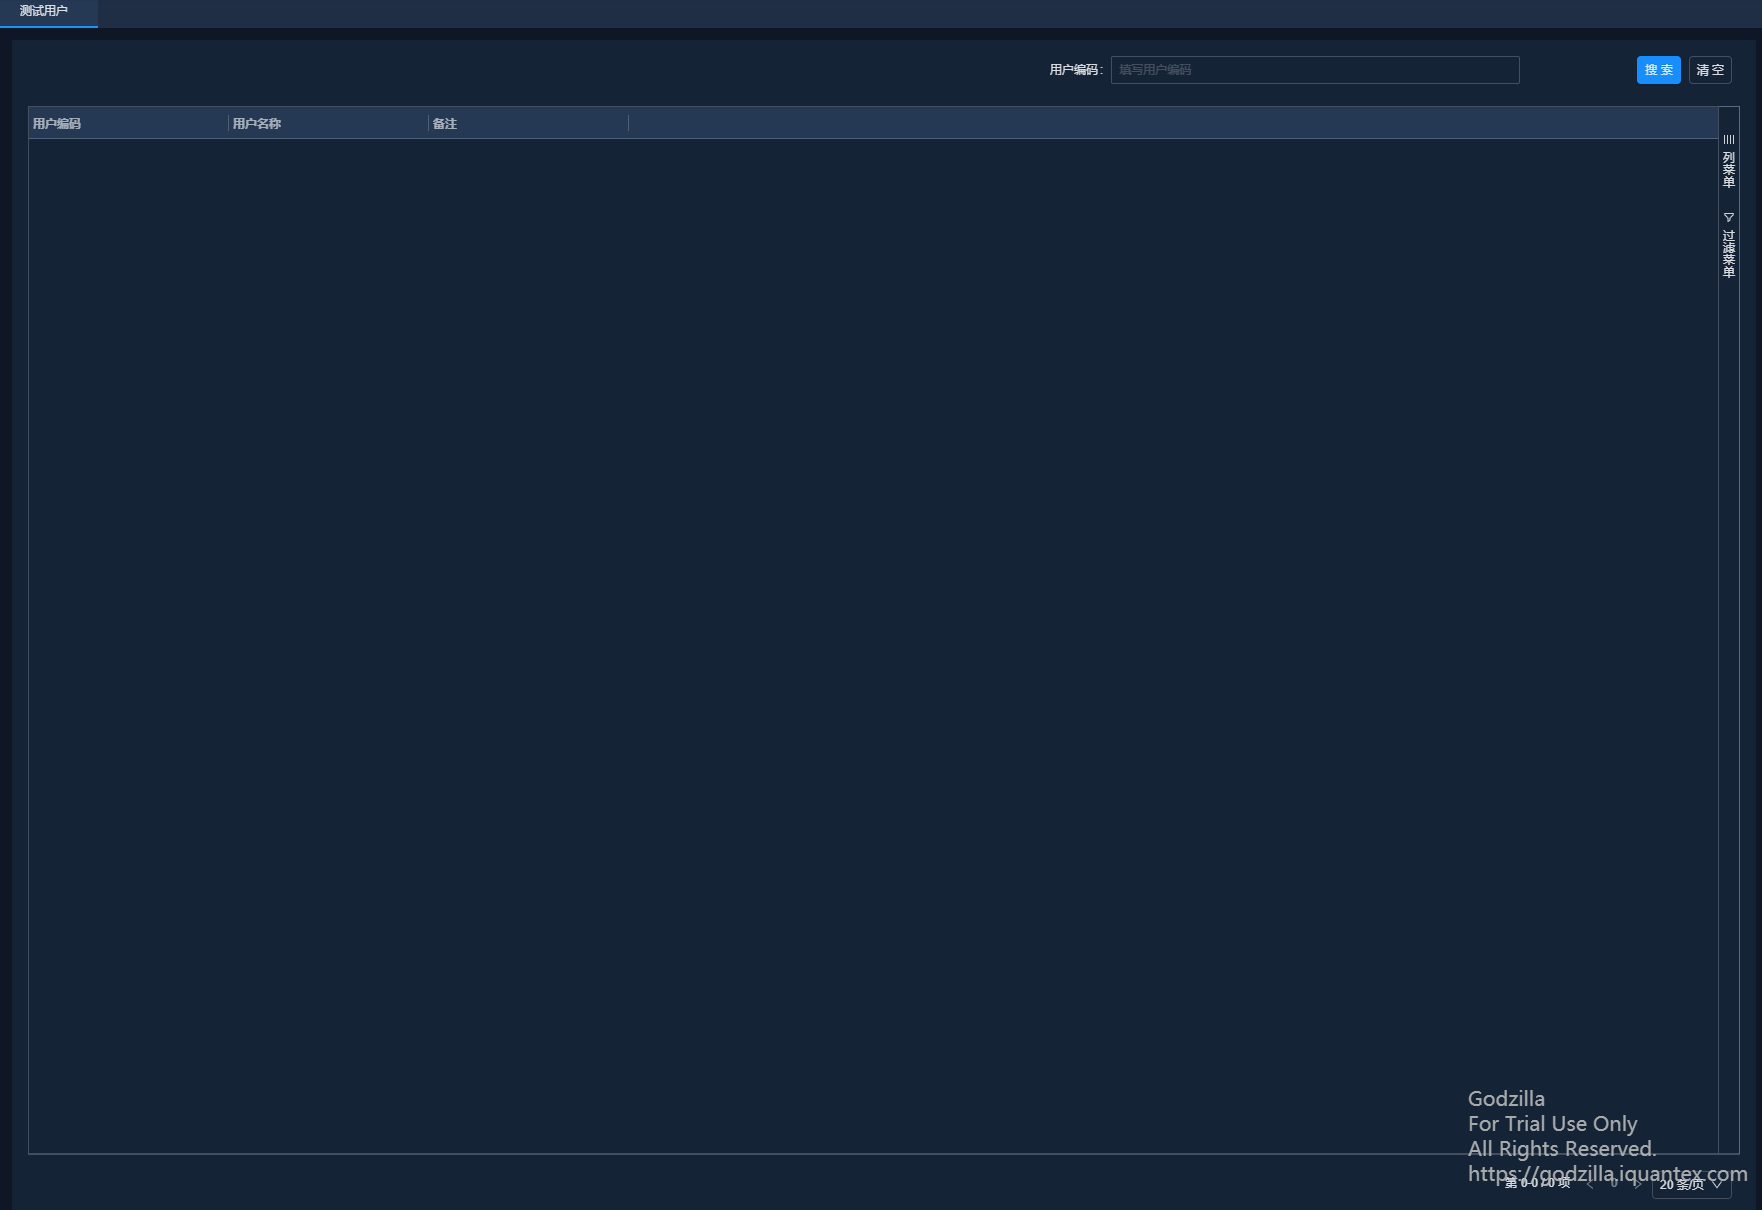
2.3 最终效果
这样,一个查询功能就做好了,还支持用户编码模糊查询
3 增加新增用户功能
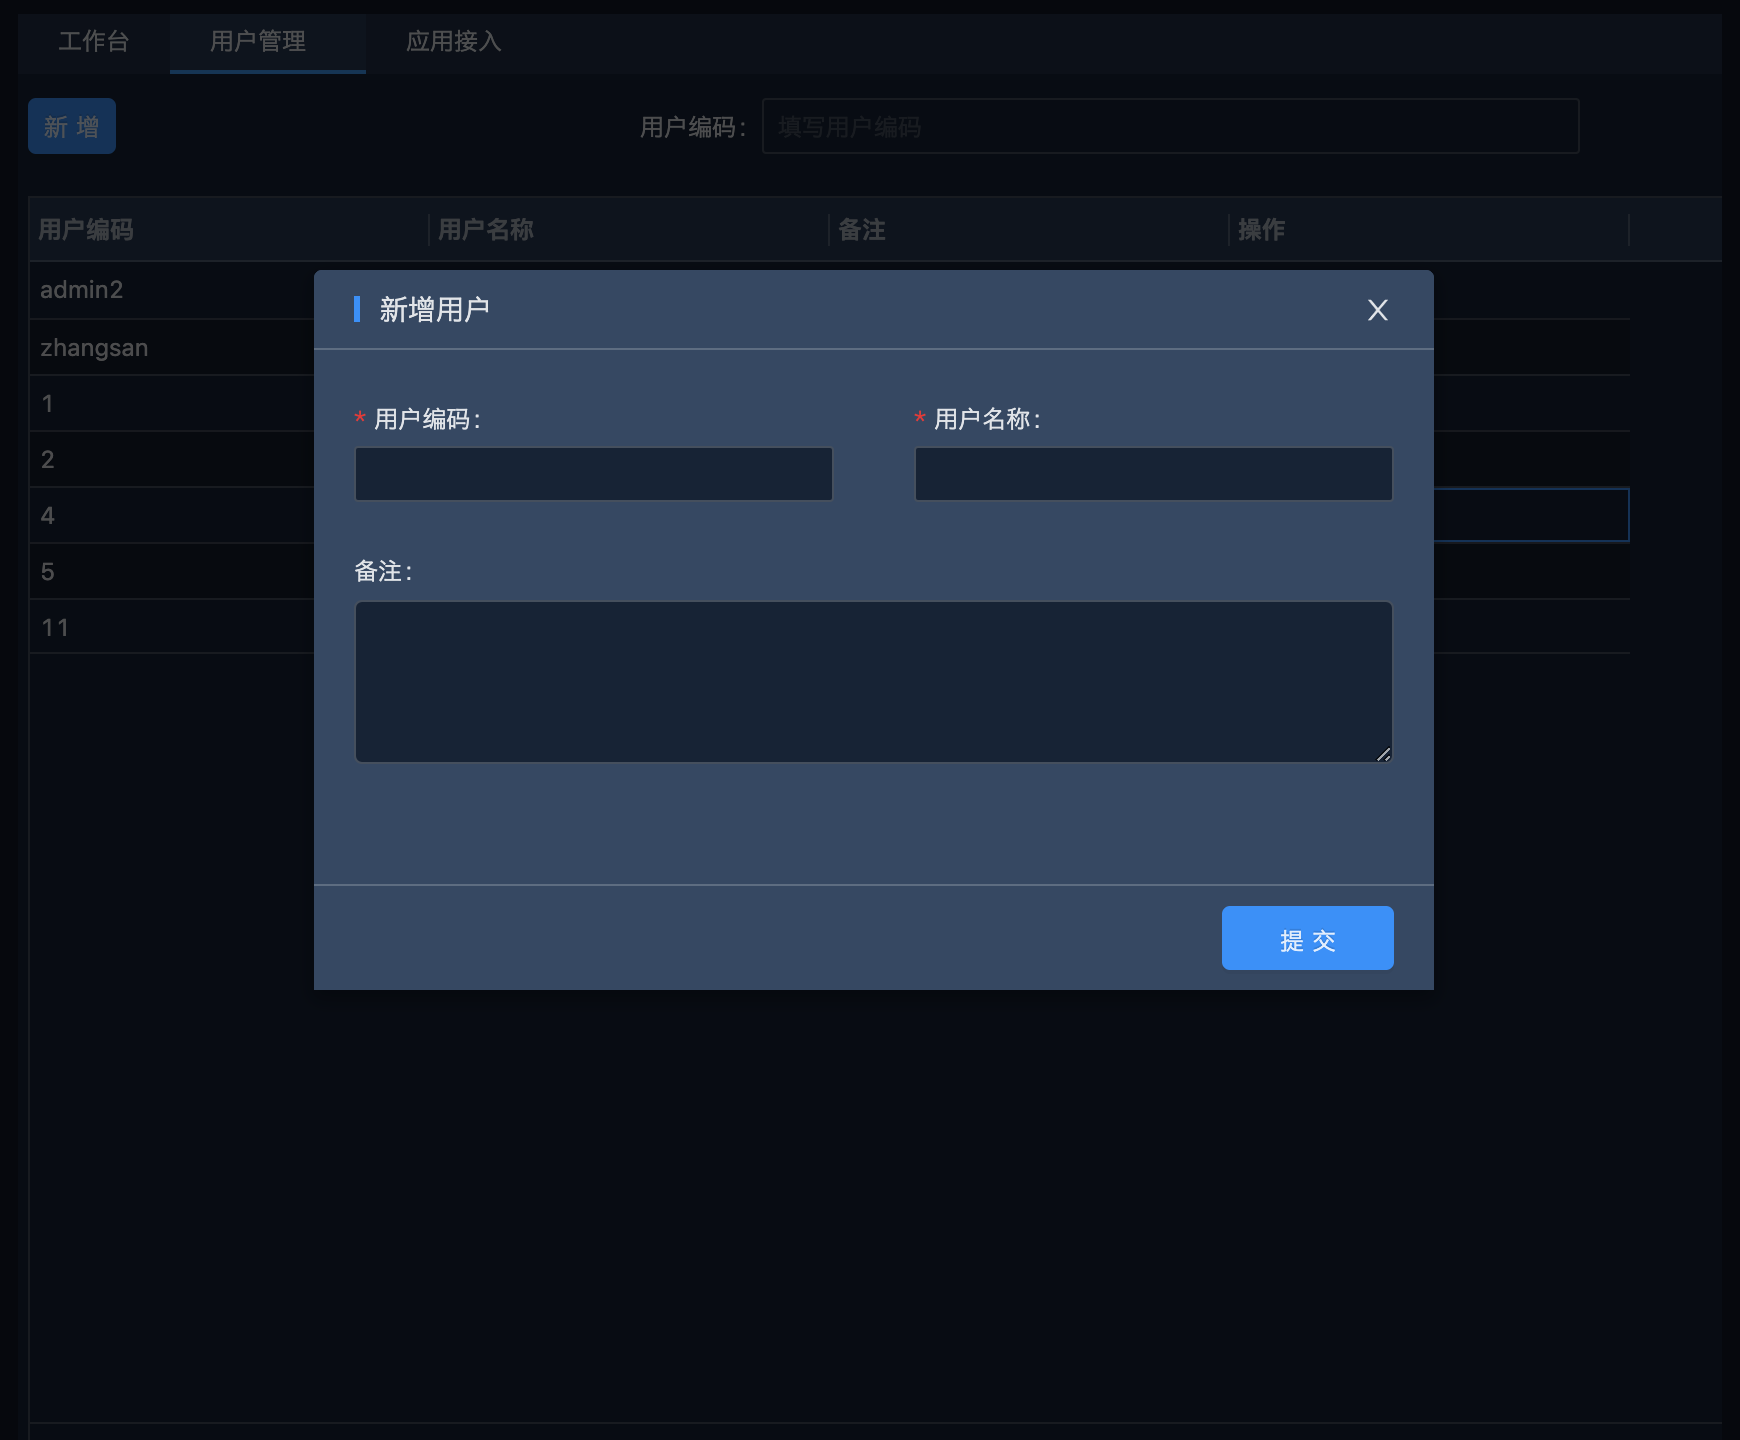
这里涉及到两个组件,一个是用到了模态框 Modal 组件,一个是用到了 Antd 的原生 Form 组件,还涉及到一个与后端交互的 api
3.1 增加【新增】按钮
参考 http://design.iquantex.com/components/AgGrid-cn/#scaffold-app-components-AgGrid-demo-7-SearchFormTable-PageTable 可以很方便的增加一个按钮
3.2 增加【表单】页面
新增 Form.jsx
import React, { Component } from 'react';
import { Form, Input, Button } from 'antd';
import { Util } from '@gza/quantex-utils';
import { Alert } from '@gza/quantex-design';

const FormItem = Form.Item;

@Form.create()
export default class FormComponent extends Component {
  handleSubmit = e => {
    e.preventDefault();
    const { form, store, onClose } = this.props;
    form.validateFields(async (err, values) => {
      if (!err) {
        let params = Util.buildFormData(values);
        const res = await store.addUser(params);
        if (res.code === 200) {
          Alert.info('新增成功', close => {
            close();
            onClose(); // 回调方法
          });
        } else {
          Alert.error(res);
        }
      }
    });
  };
  render() {
    const { form } = this.props;
    const { getFieldDecorator } = form;
    return (
      <Form className="form-content-wrapper" onSubmit={this.handleSubmit}>
        <div className="form-main-content">
          <div className="form-row-multi-items">
            <FormItem label="用户编码">
              {getFieldDecorator('code', {
                rules: [{ required: true, message: '必填' }]
              })(<Input size="small" />)}
            </FormItem>
            <FormItem label="用户名称">
              {getFieldDecorator('name', {
                rules: [{ required: true, message: '必填' }]
              })(<Input size="small" />)}
            </FormItem>
          </div>
          <FormItem label="备注">
            {getFieldDecorator('remark', {
              rules: [{ max: 32, message: '最大字数不超过32个汉字' }]
            })(<Input.TextArea rows={4} />)}
          </FormItem>
        </div>
        <div className="form-btn-wrapper">
          <Button size="small" type="primary" htmlType="submit">
            提交
          </Button>
        </div>
      </Form>
    );
  }
}
3.3 关联起来
新增 Store.js
import { observable, action } from 'mobx';
import { API } from '@gza/quantex-utils';
import { Alert } from 'antd';

class Store {
  api = new API('sample');

  @action
  addUser = params => {
    return this.api.post('/api/v1/users', params);
  };
}
export default Store;
修改 index.jsx
import React, { Component, Fragment } from 'react';
import { observer } from 'mobx-react';
import { AgGrid, Modal } from '@gza/quantex-design';
import { Button } from 'antd';
import Store from './Store';
import UserForm from './Form';

@observer
class UserComponent extends Component {
  store = new Store();
  modal = new Modal.Store();

  searchApi = AgGrid.createSearchApi({
    api: 'sample',
    url: '/api/v1/users/query',
    method: 'get'
  });

  tableConfig = {
    tableId: AgGrid.Table.ID.sample_User_index,
    props: {
      columnDefs: [
        { headerName: '用户编码', field: 'code' },
        { headerName: '用户名称', field: 'name' },
        { headerName: '备注', field: 'remark' }
      ],
      pagination: true,
      rowModelType: 'serverSide',
      paginationPageSize: 20,
    },
    onTableReady: tableStore => {
      this.tableStore = tableStore;
    }
  };

  formConfig = {
    fields: [
      {
        name: 'code',
        label: '用户编码',
        component: 'Input'
      }
    ]
  };
  showAddForm = () => {
    // 传递onClose回调方法
    const onClose = () => {
      this.modal.close(); // 关闭模态框
      this.tableStore.reload(); // 刷新表格数据
    };
    this.modal.openForm('新增用户', <UserForm store={this.store} onClose={onClose} />);
  };
  render() {
    return (
      <Fragment>
        <div className="qx-main">
          <AgGrid.SearchFormTable
            tableConfig={this.tableConfig}
            formConfig={this.formConfig}
            searchApi={this.searchApi}
          >
            <Button size="small" onClick={this.showAddForm} type="primary">
              新增
            </Button>
          </AgGrid.SearchFormTable>
        </div>
        <Modal {...this.modal.props}></Modal>
      </Fragment>
    );
  }
}

export default UserComponent;
3.4 最终效果
4. 增加修改用户功能
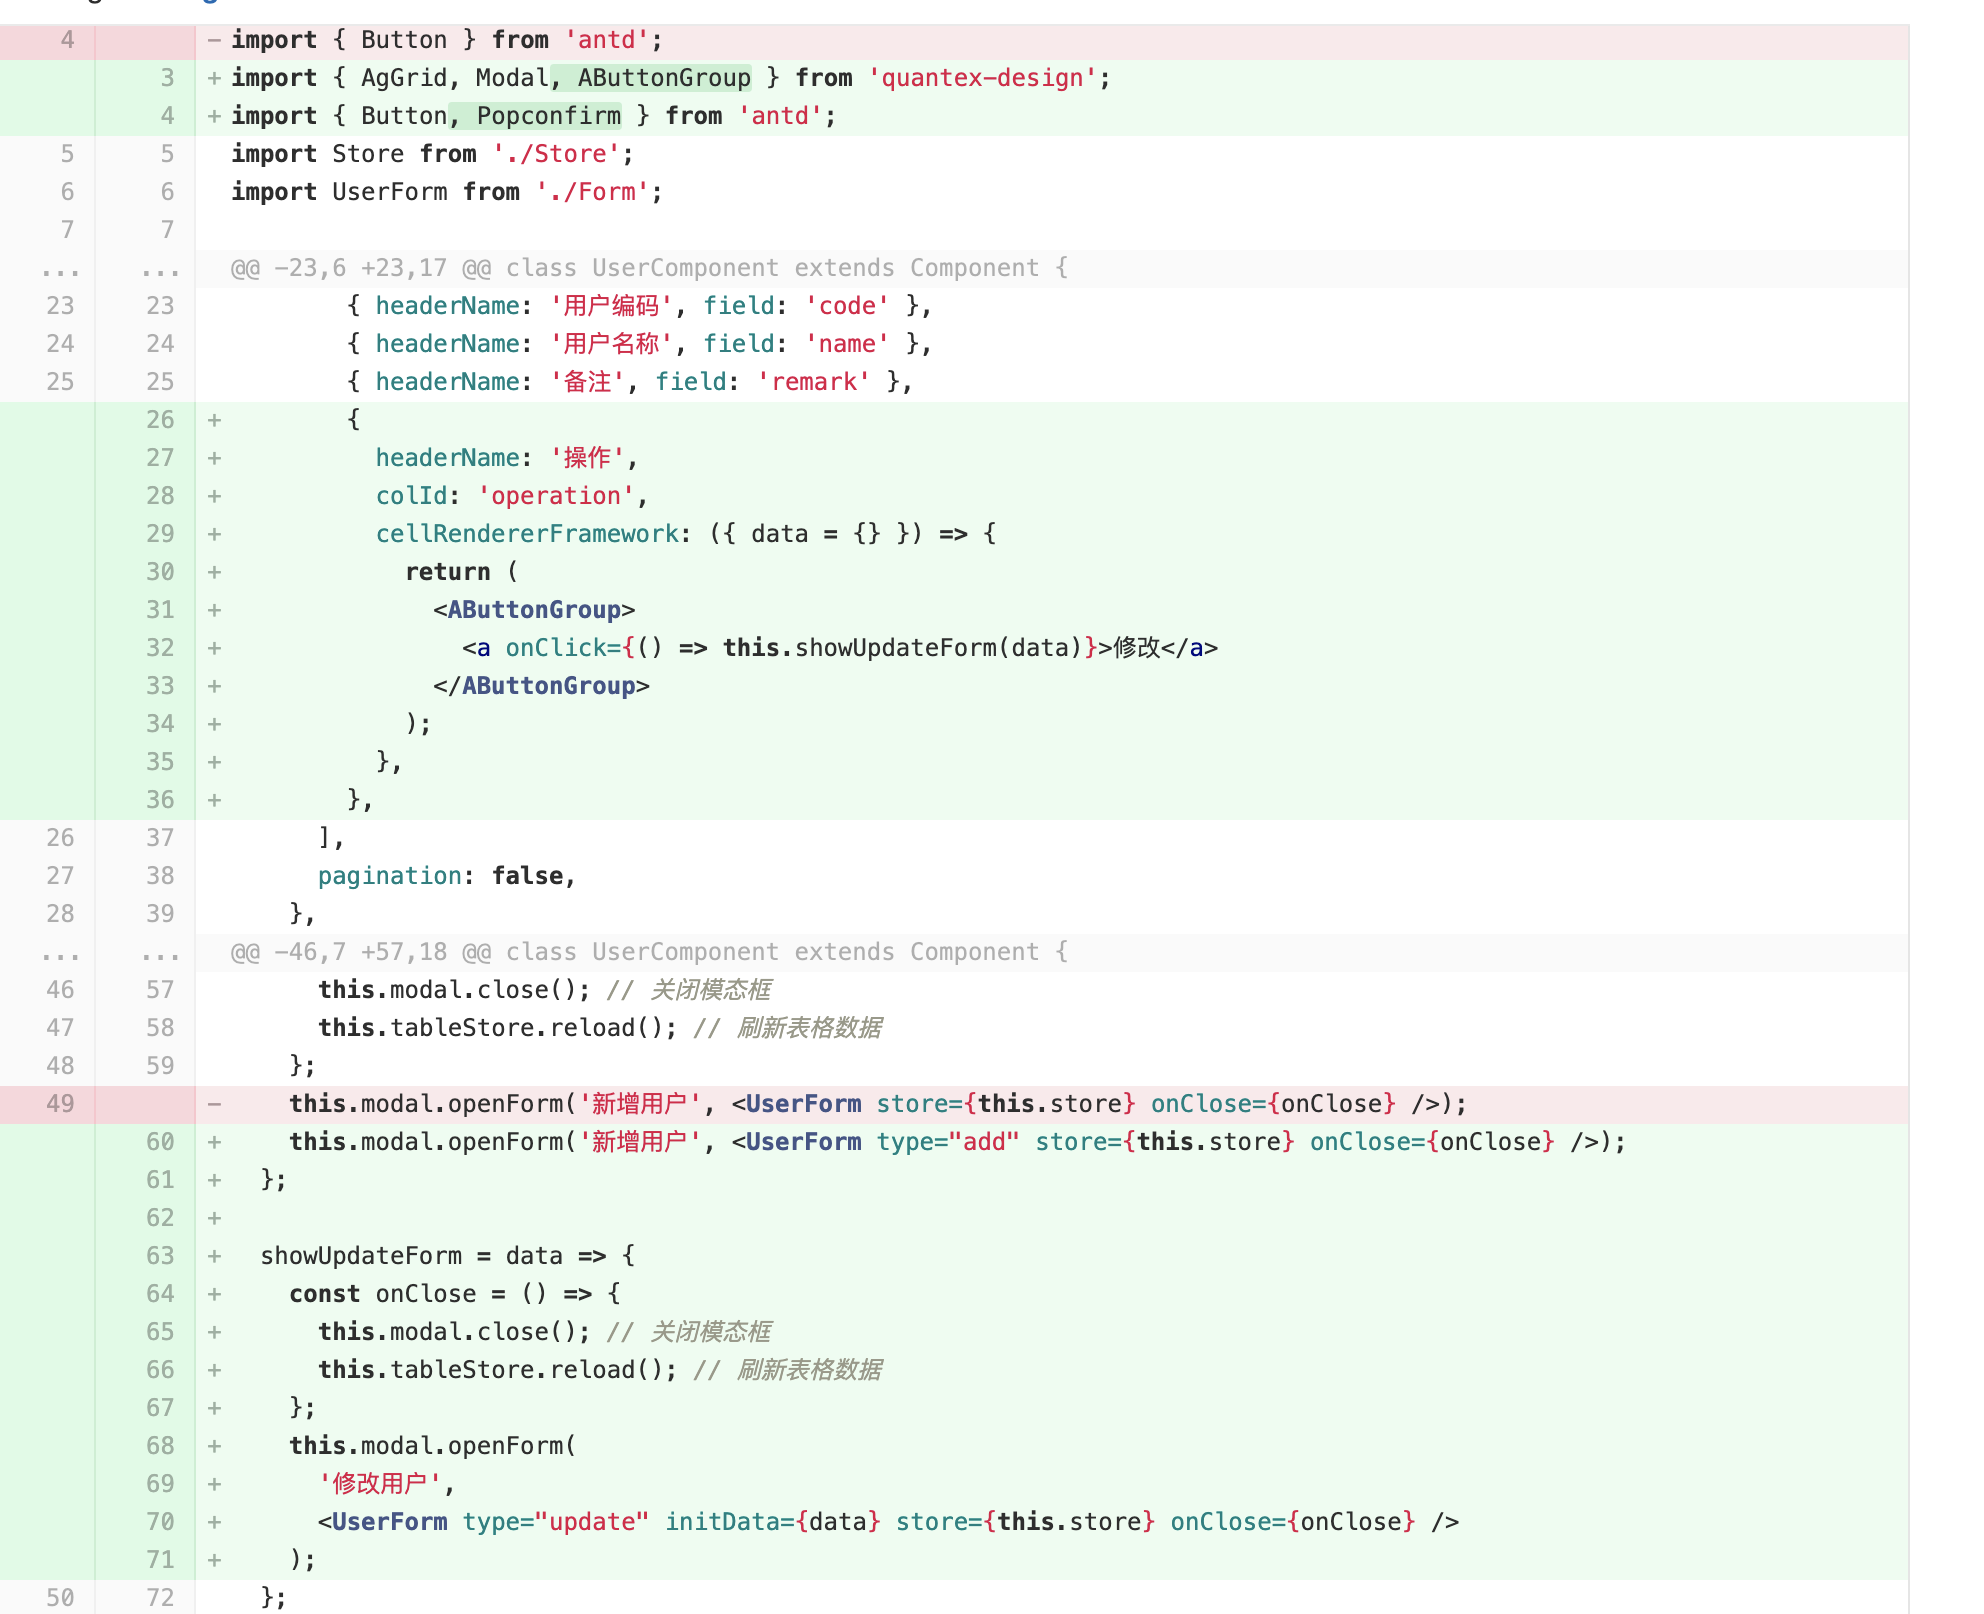
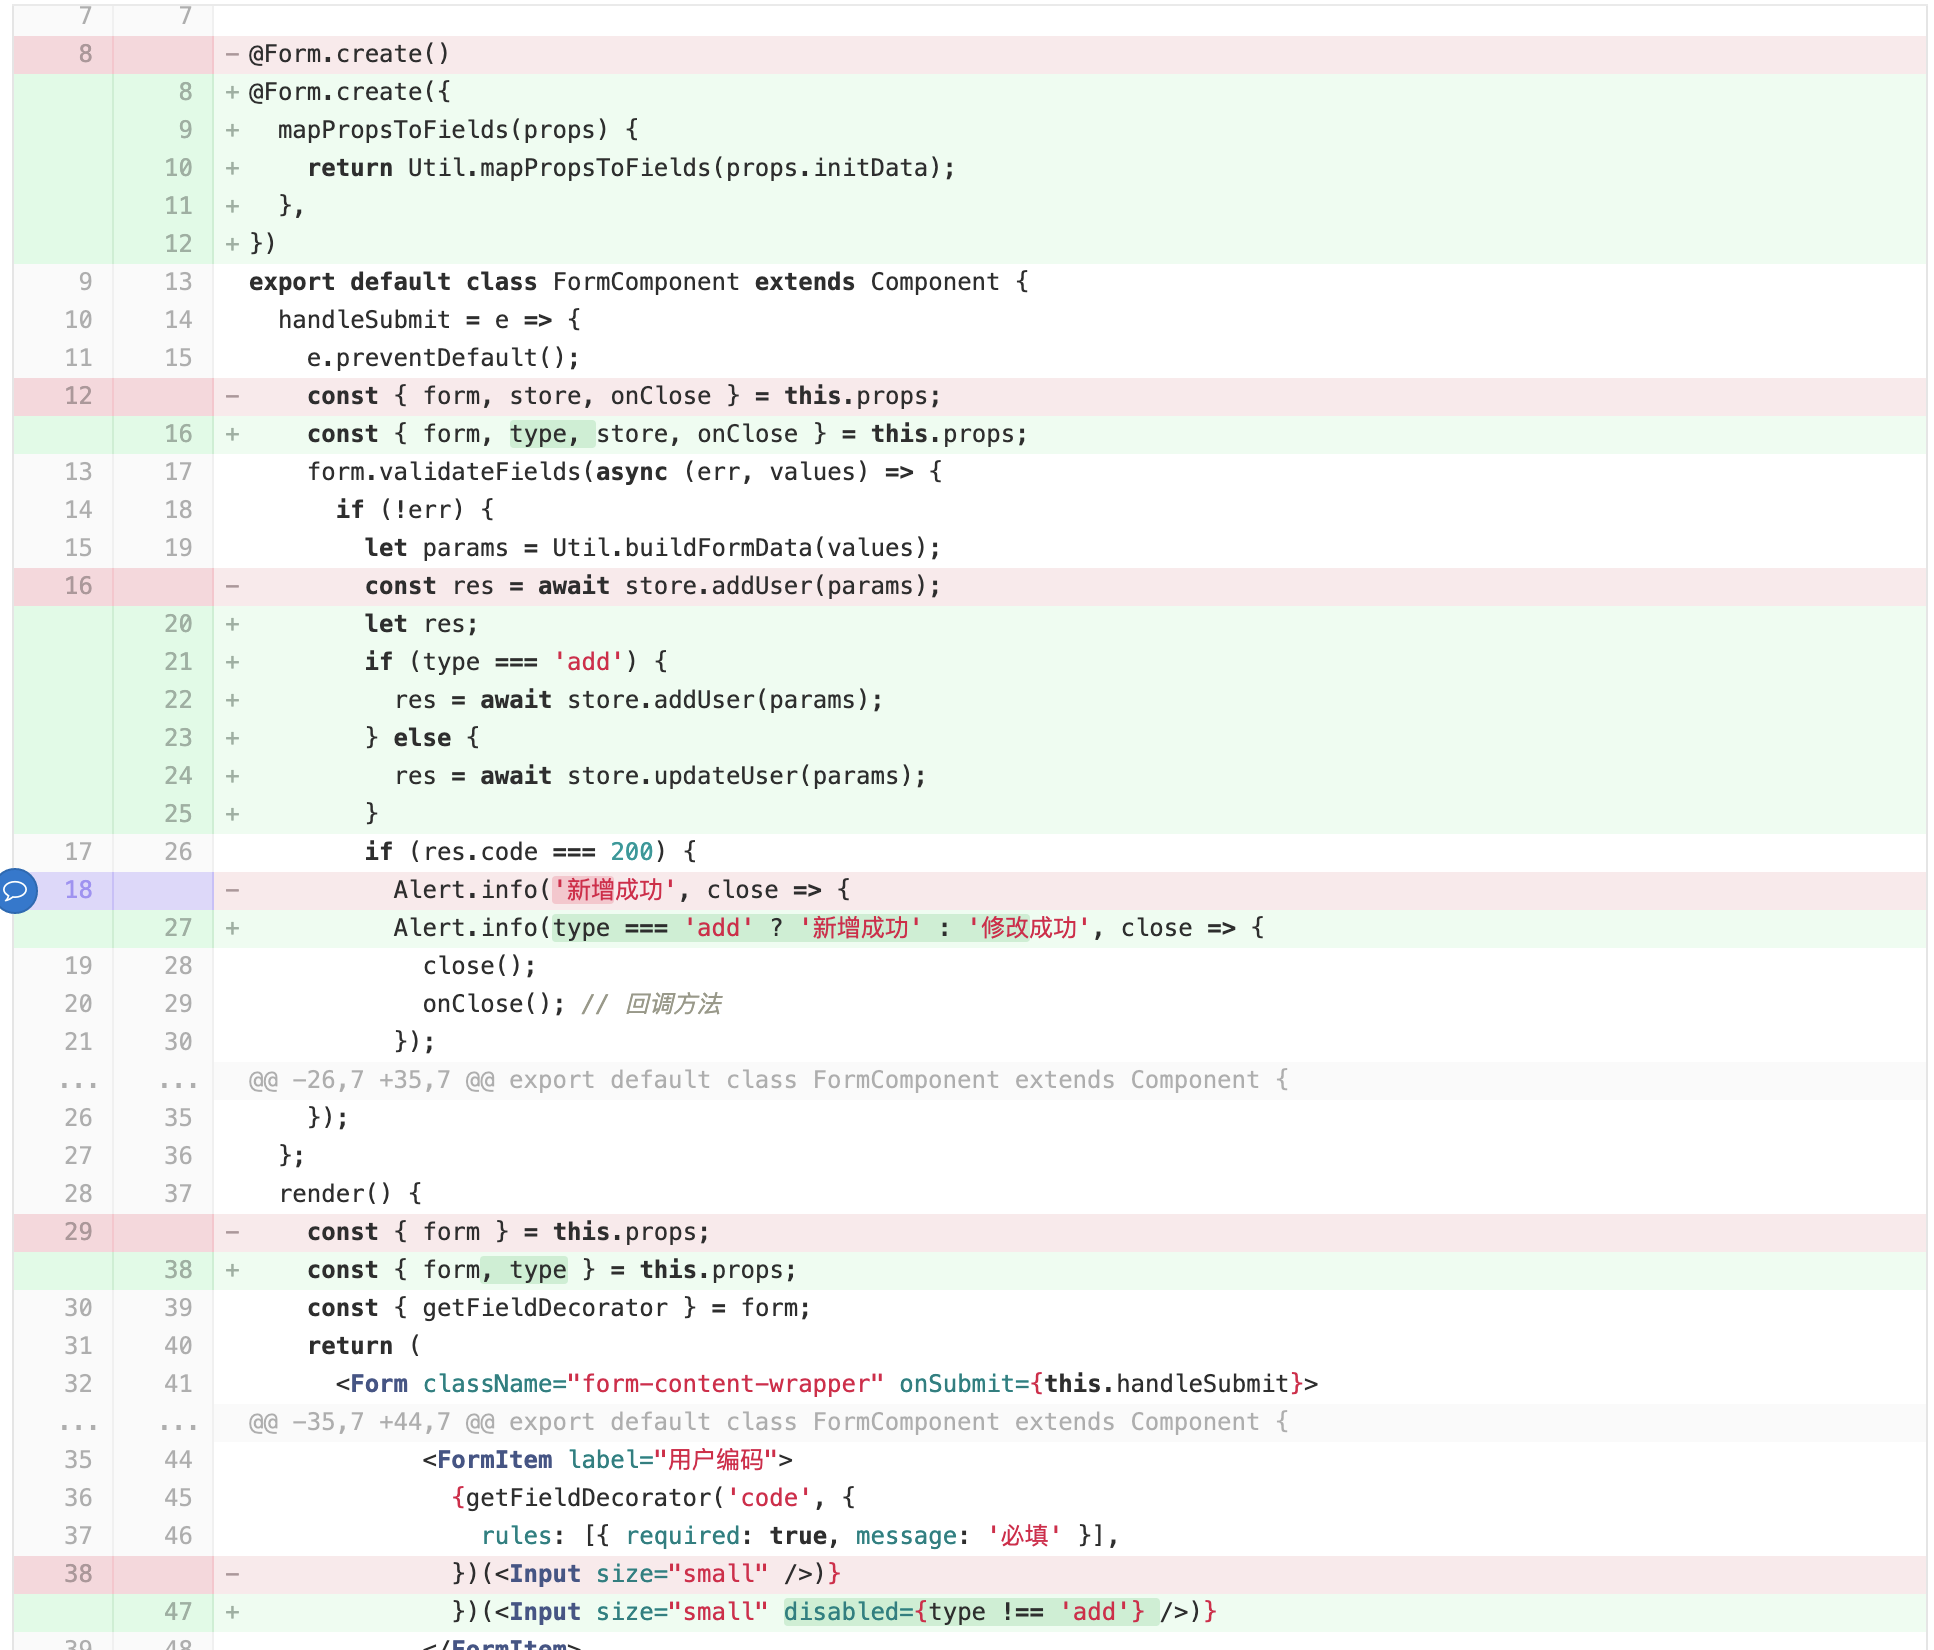
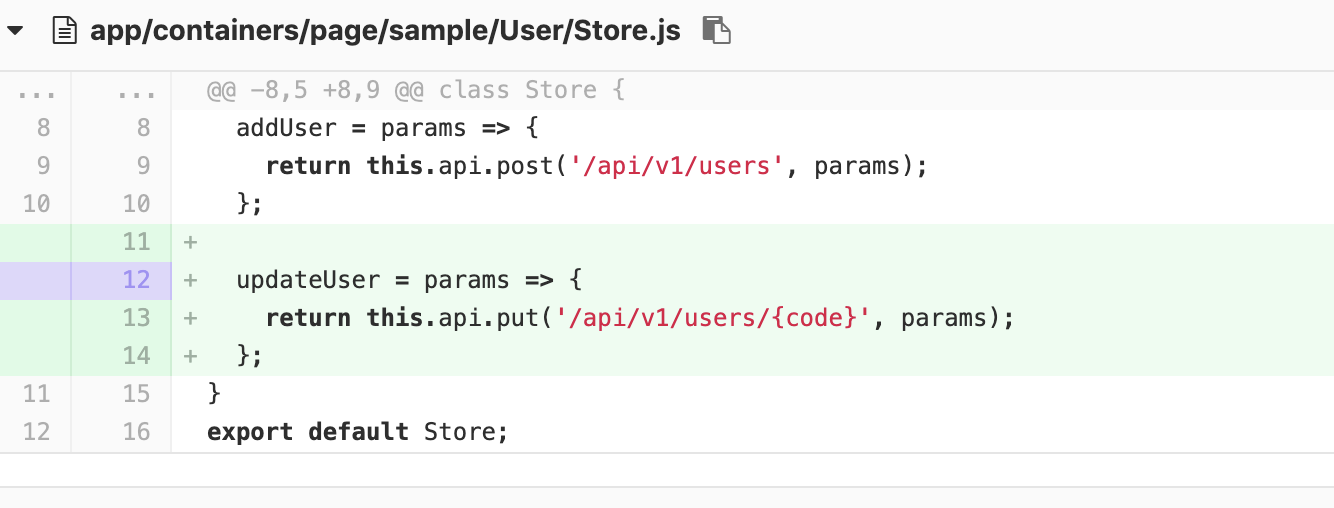
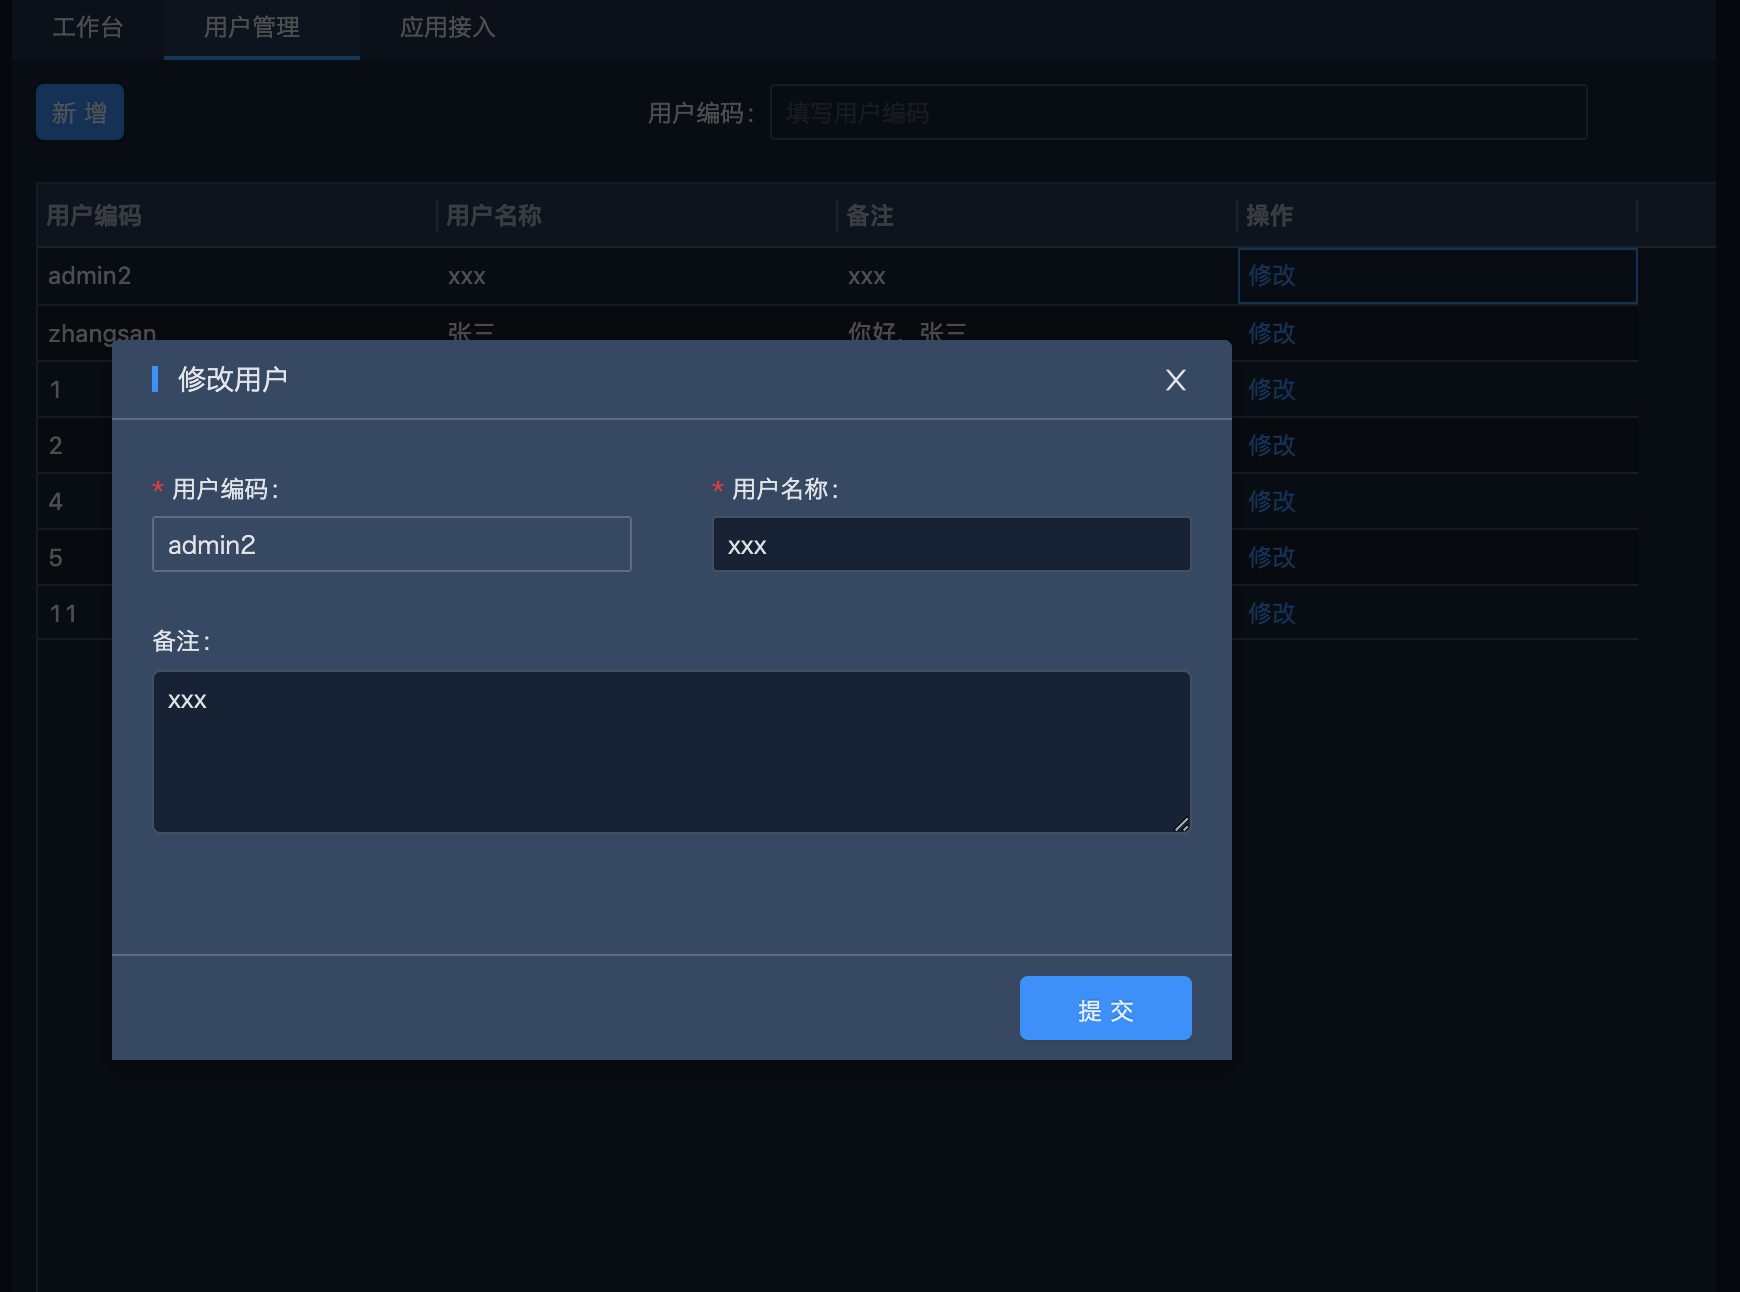
修改的功能和新增类似,因此可以共用一个表单,只需要做一些简单的修改
4.1 修改 index.jsx ,增加操作列
4.2 修改 Form.jsx,支持修改用户功能
4.3 修改 Store.js,增加修改用户方法
4.4 最终效果
5. 增加删除用户功能
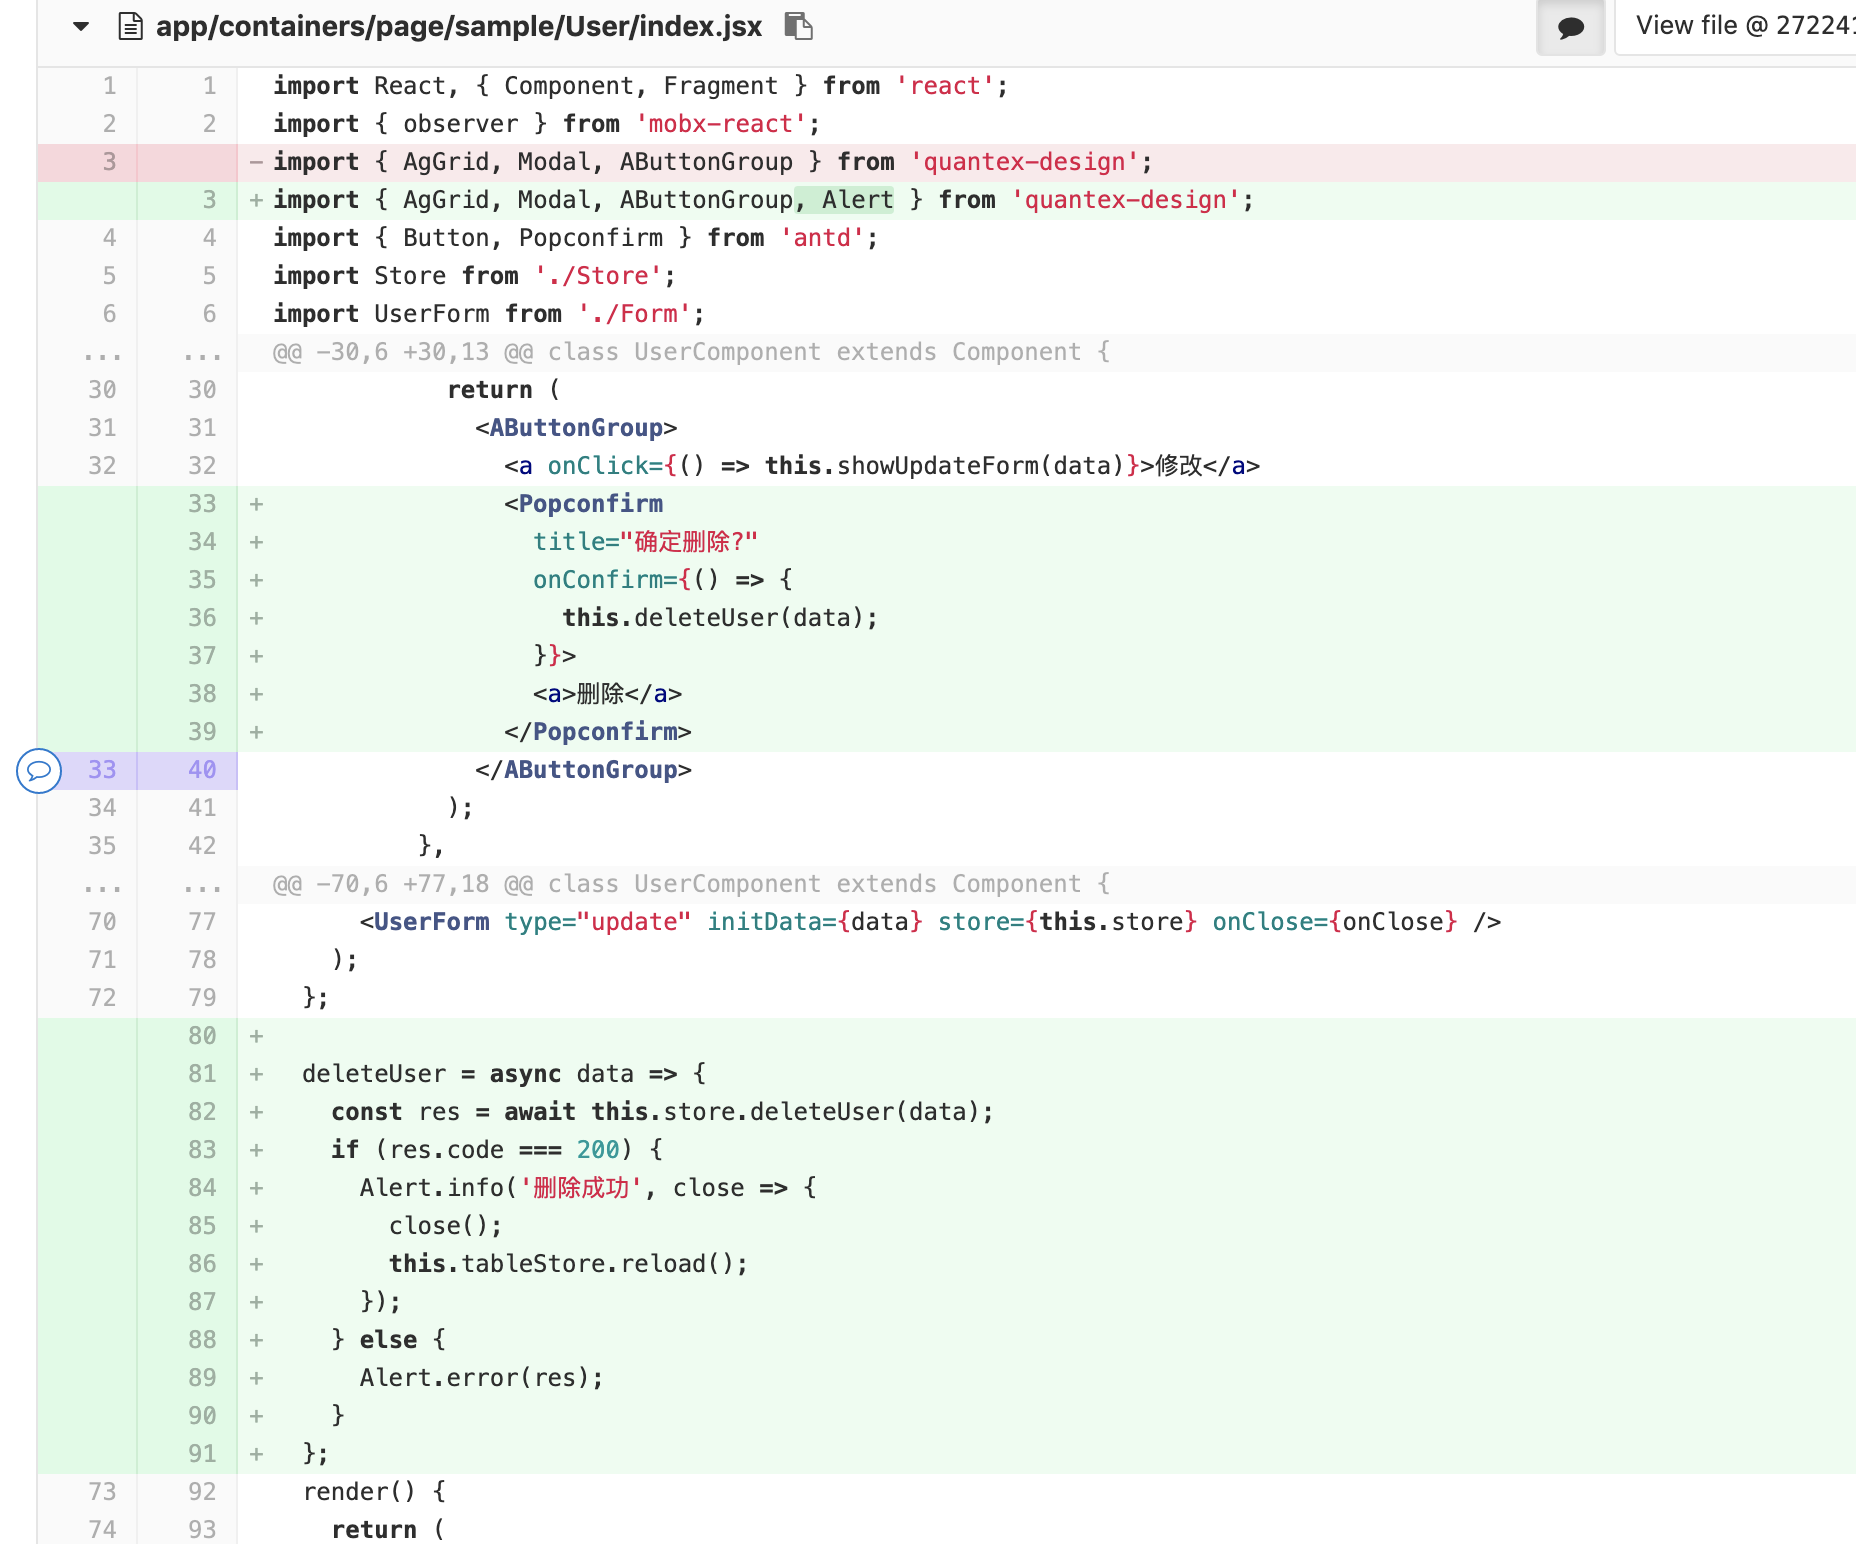
5.1 修改 index.jsx 操作列,增加删除按钮
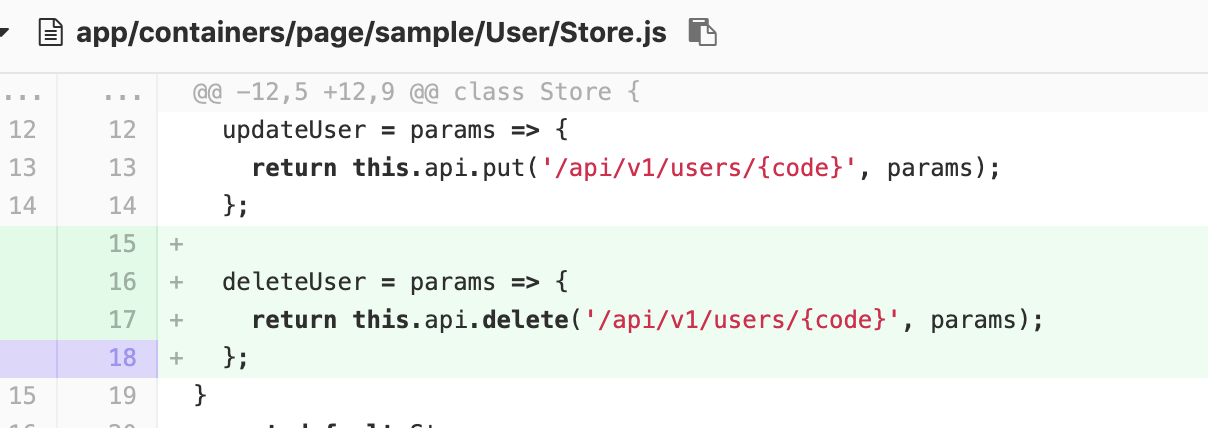
5.2 修改 Store.js,增加删除用户方法
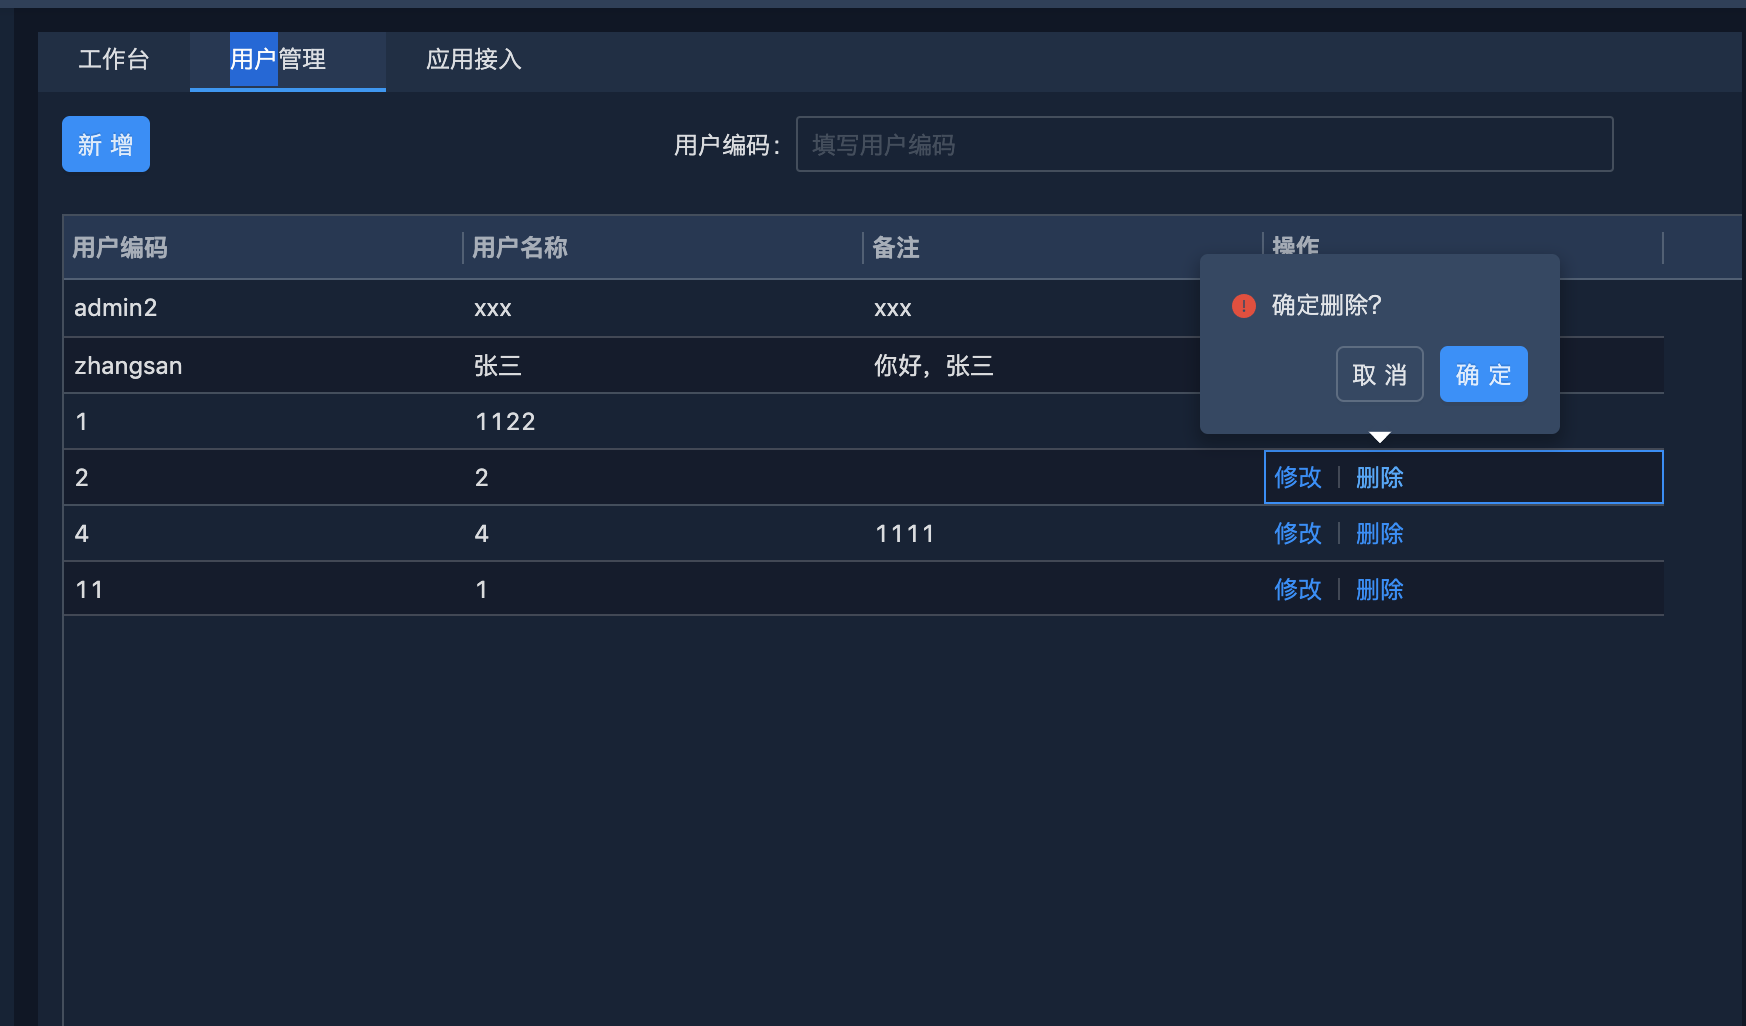
5.3 最终效果
6. 使用 easyApi
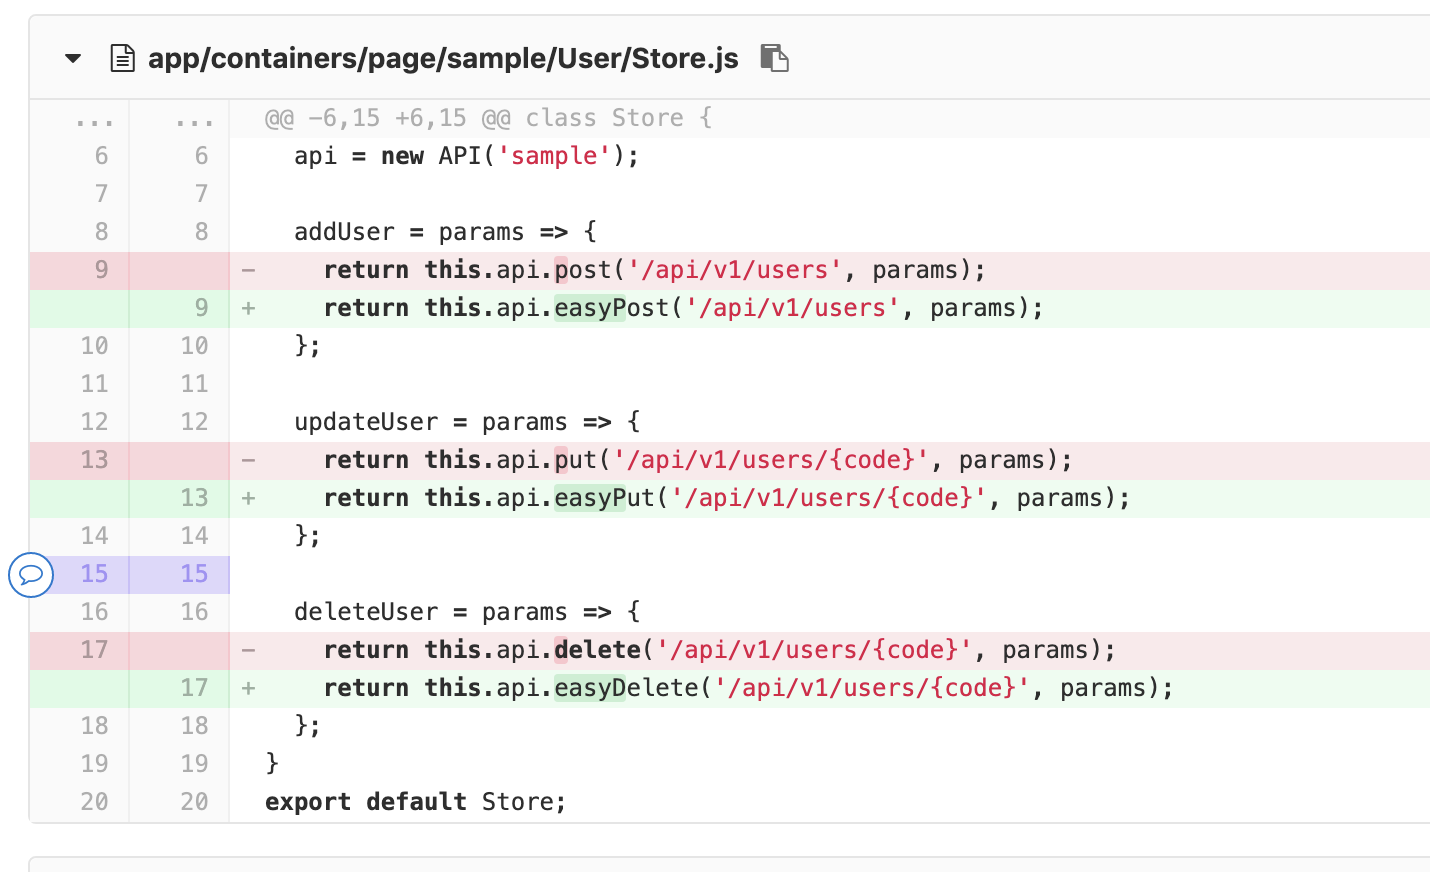
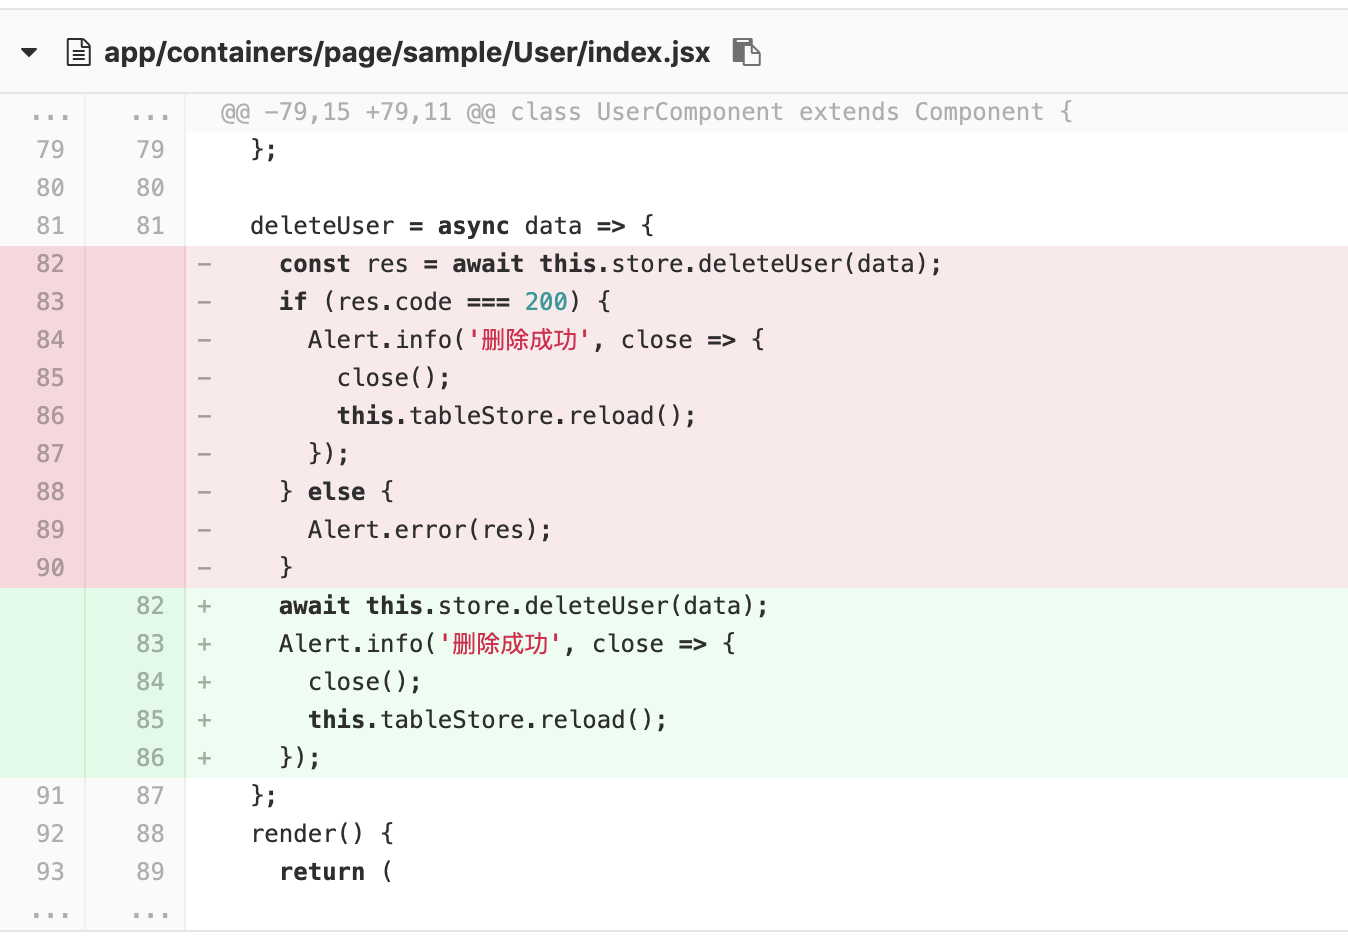
我们可以看到,在处理接口返回值的时候,总有两种情况,一种是处理成功,一种是处理失败,一般来讲,如果返回码是 200,则弹出提示框 Alert.info('xxx'), 如果不是 200,则弹出错误框 Alert.error( res ), 使用 easyApi 可以将错误的提示可以统一处理。参考使用easyApi
6.1 Store.js
将请求方式替换成 easyApi
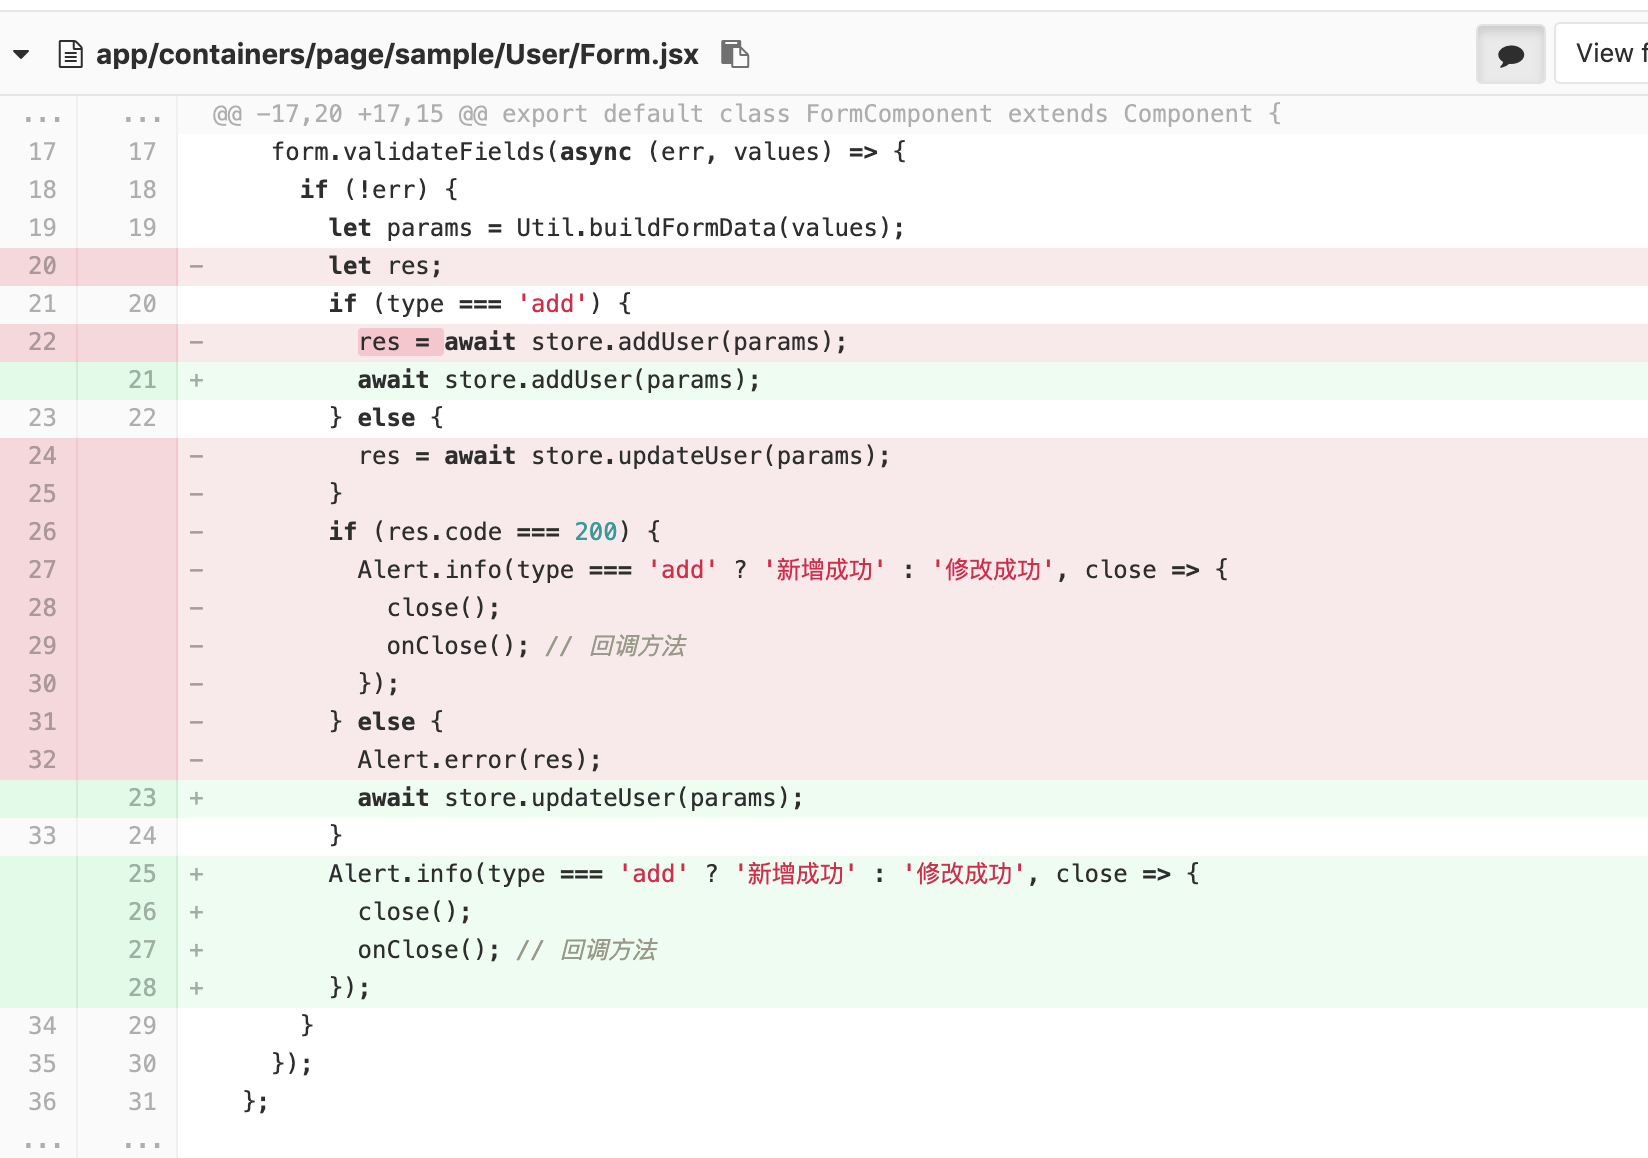
6.2 Form.jsx
修改 handleSubmit 方法,删除 Alert.error 逻辑
6.3 index.jsx
修改 deleteUser 方法,删除 Alert.error 逻辑
7. 使用 @response
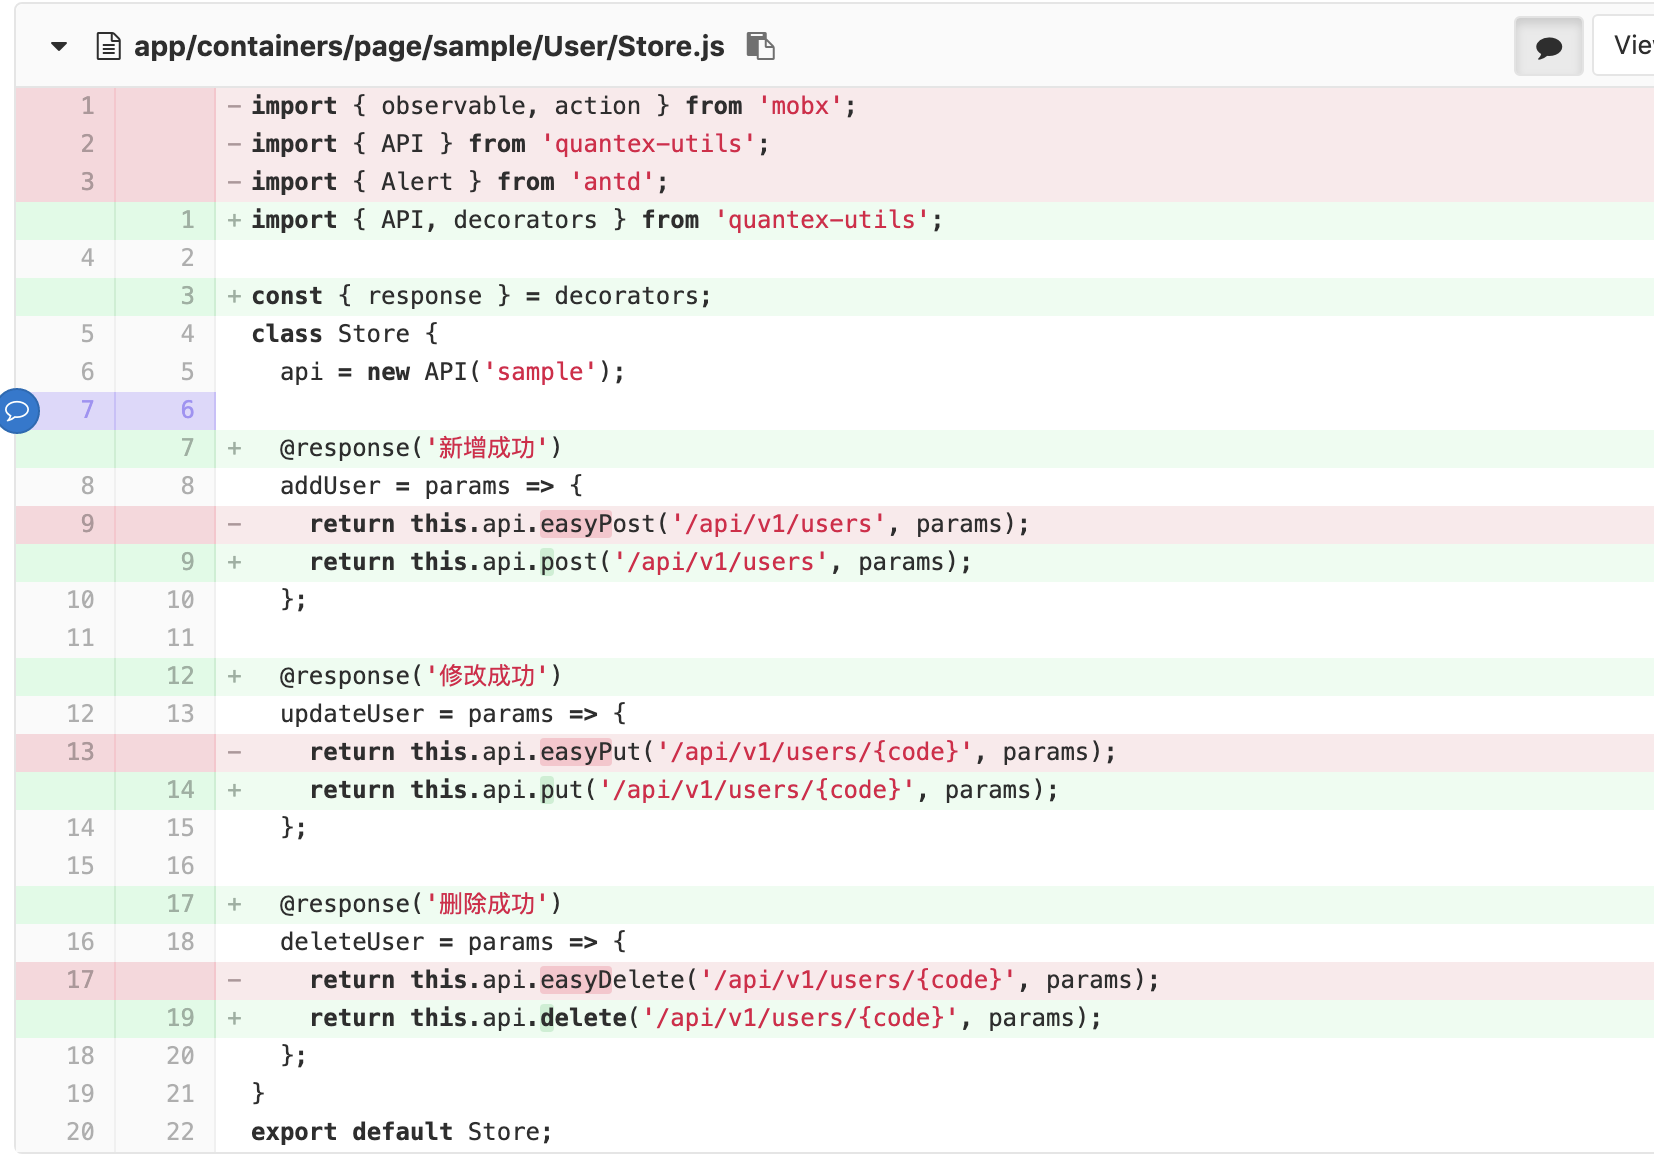
进一步使用装饰器来装饰 api 方法,使代码更简洁,参考使用装饰器
7.1 Store.js
使用 @respose
7.2 Form.jsx
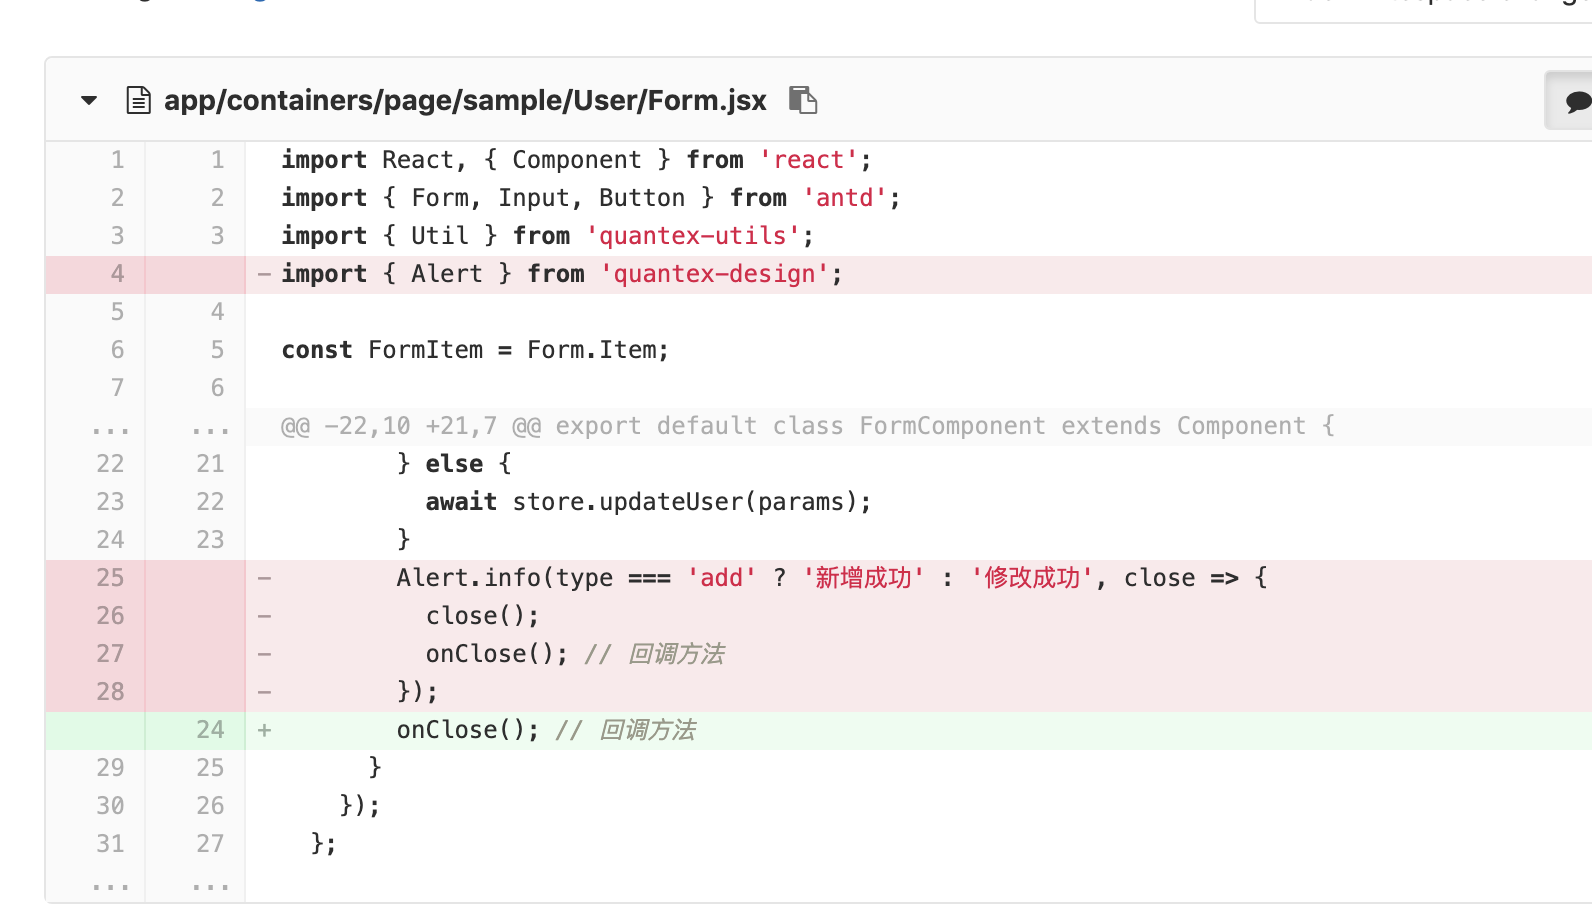
修改 handleSubmit 方法,删除 Alert.info 逻辑
7.3 index.jsx
修改 deleteUser 方法,删除 Alert.info 逻辑
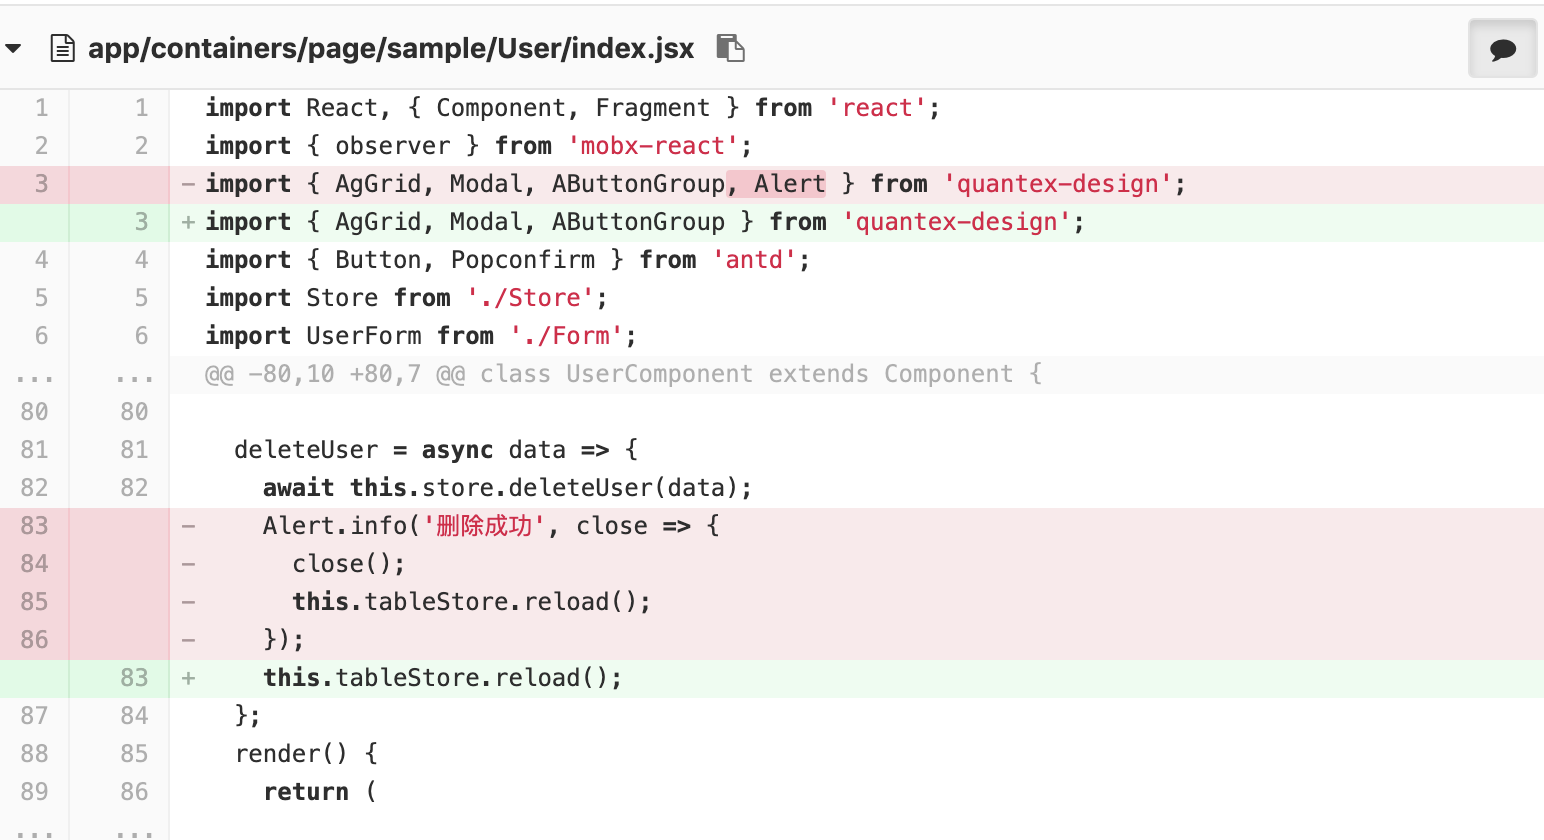
8. 使用 react-hooks
使用 React 的 Hooks 特性重构代码
8.1 重构 Form.jsx
import React from 'react';
import { Form, Input, Button } from 'antd';
import { Util } from '@gza/quantex-utils';

const FormItem = Form.Item;

const FormComponent = props => {
  const { form, type, store, onClose } = props;
  const handleSubmit = e => {
    e.preventDefault();
    form.validateFields(async (err, values) => {
      if (!err) {
        let params = Util.buildFormData(values);
        if (type === 'add') {
          await store.addUser(params);
        } else {
          await store.updateUser(params);
        }
        onClose(); // 回调方法
      }
    });
  };

  const { getFieldDecorator } = form;
  return (
    <Form className="form-content-wrapper" onSubmit={handleSubmit}>
      <div className="form-main-content">
        <div className="form-row-multi-items">
          <FormItem label="用户编码">
            {getFieldDecorator('code', {
              rules: [{ required: true, message: '必填' }]
            })(<Input size="small" disabled={type !== 'add'} />)}
          </FormItem>
          <FormItem label="用户名称">
            {getFieldDecorator('name', {
              rules: [{ required: true, message: '必填' }]
            })(<Input size="small" />)}
          </FormItem>
        </div>
        <FormItem label="备注">
          {getFieldDecorator('remark', {
            rules: [{ max: 32, message: '最大字数不超过32个汉字' }]
          })(<Input.TextArea rows={4} />)}
        </FormItem>
      </div>
      <div className="form-btn-wrapper">
        <Button size="small" type="primary" htmlType="submit">
          提交
        </Button>
      </div>
    </Form>
  );
};

export default Form.create({
  mapPropsToFields(props) {
    return Util.mapPropsToFields(props.initData);
  }
})(FormComponent);
8.2 重构 index.jsx
import React, { Fragment } from 'react';
import { observer } from 'mobx-react';
import { AgGrid, Modal, AButtonGroup } from '@gza/quantex-design';
import { Button, Popconfirm } from 'antd';
import Store from './Store';
import UserForm from './Form';

const UserComponent = () => {
  const store = new Store();
  const modal = new Modal.Store();
  let tableStore;

  const onClose = () => {
    modal.close(); // 关闭模态框
    tableStore.reload(); // 刷新表格数据
  };

  const showAddForm = () => {
    modal.openForm('新增用户', <UserForm type="add" store={store} onClose={onClose} />);
  };

  const showUpdateForm = data => {
    modal.openForm('修改用户', <UserForm type="update" initData={data} store={store} onClose={onClose} />);
  };

  const deleteUser = async data => {
    await store.deleteUser(data);
    tableStore.reload();
  };

  const searchApi = AgGrid.createSearchApi({
    api: 'sample',
    url: '/api/v1/users/query',
    method: 'get'
  });

  const tableConfig = {
    tableId: AgGrid.Table.ID.sample_UserHooks_index,
    props: {
      columnDefs: [
        { headerName: '用户编码', field: 'code' },
        { headerName: '用户名称', field: 'name' },
        { headerName: '备注', field: 'remark' },
        {
          headerName: '操作',
          colId: 'operation',
          cellRendererFramework: ({ data = {} }) => {
            return (
              <AButtonGroup>
                <a onClick={() => showUpdateForm(data)}>修改</a>
                <Popconfirm
                  title="确定删除?"
                  onConfirm={() => {
                    deleteUser(data);
                  }}
                >
                  <a>删除</a>
                </Popconfirm>
              </AButtonGroup>
            );
          }
        }
      ],
      pagination: true,
      rowModelType: 'serverSide',
      paginationPageSize: 20,
    },
    onTableReady: store2 => {
      tableStore = store2;
    }
  };

  const formConfig = {
    fields: [
      {
        name: 'code',
        label: '用户编码',
        component: 'Input'
      }
    ]
  };

  return (
    <Fragment>
      <div className="qx-main">
        <AgGrid.SearchFormTable tableConfig={tableConfig} formConfig={formConfig} searchApi={searchApi}>
          <Button size="small" onClick={showAddForm} type="primary">
            新增
          </Button>
        </AgGrid.SearchFormTable>
      </div>
      <Modal store={modal}></Modal>
    </Fragment>
  );
};

export default observer(UserComponent);
9. 使用 TypeScript
重构为 TypeScript,参考示例代码,这里就不贴出来了